Deleted
Deleted Member
Posts: 0
|
Post by Deleted on Jun 11, 2010 19:38:43 GMT -6
Pretty good how to.
That is something I have been telling people a lot. Buy some inexpensive wood and go for it. I have a lot of people say to me I wish I could build a guitar form scratch. But unless you start some where you will never do it. I have shown people that it doesn't take a lot of tools to get started and still I don't see to many trying it out for them selves.
Again you will never know until you try. And if I can do it so can you!
|
|
|
|
Post by avengers63 on Jul 10, 2010 16:53:27 GMT -6
WOW!!!! It's been quite a while since the last post. Sorry about that.  So you have your frets in their slots, all snug & secure. So whaddya do about the bits that are hanging off the edge of the fretboard? 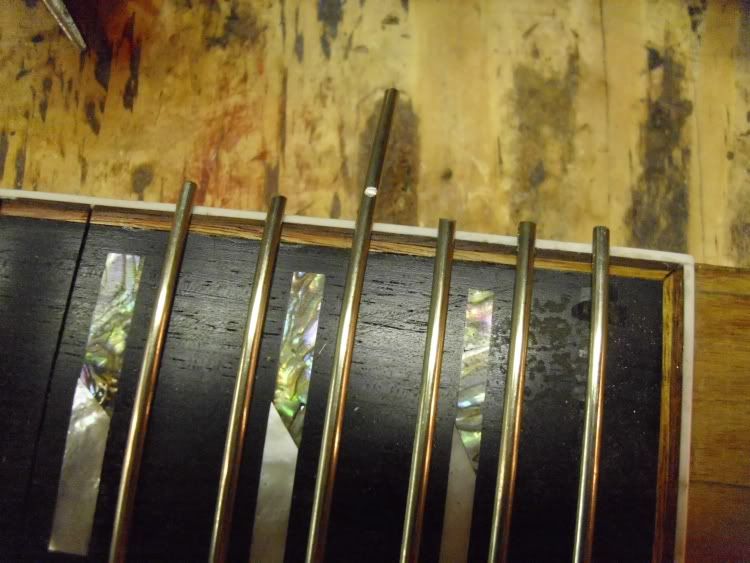 Well your Dremel should still have the cutoff wheel in it, so CAREFULLY remove the overhang as close to the fretboard as you can without touching the wheel to the wood. Alternately, you can use some heavy-duty wire cutters. 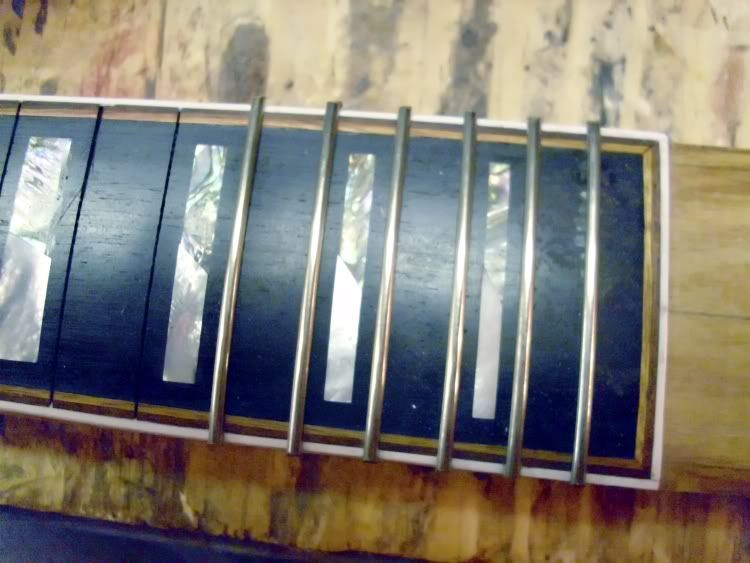 Cutting the metal makes it REALLY hot, so be careful that you don't soften/melt the binding. Actually, I cut the tang on one of these frets too long. When I hammered it into place, it was pushing out against the binding. When I cut off the overhang, the binding melted just a bit and let it form around the tang, popping the binding back into place. Sometimes it's better to be lucky than good.  So they're cut, but still jagged. Now what? Say hello to the beveling file. 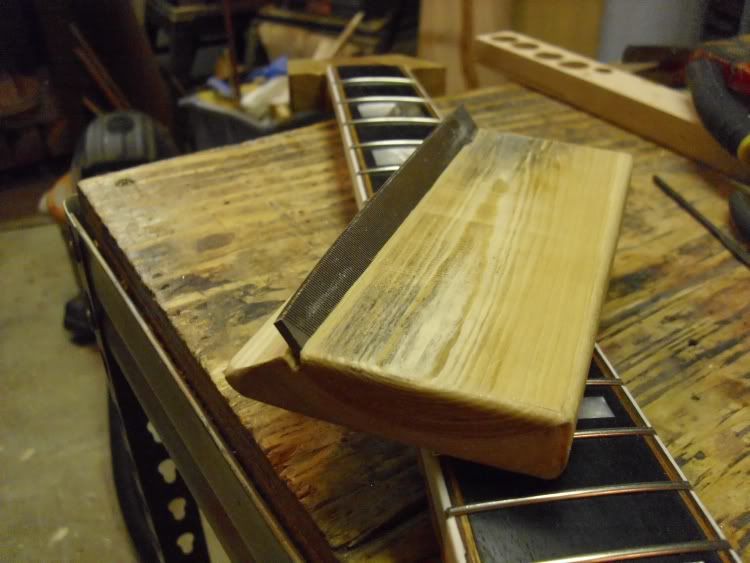 You can buy one for $35+, or make your own from a $8 file and some scrap wood. You'll see that the file is in there at a 35 degree angle. The face the file is fixed into is at a right angle to the file itself. This gives you a square face and an angled. Take the square face and file the frets down flush with the fretboard/binding. Then turn the file around and file the bevel into the edge. This should leave you with this: 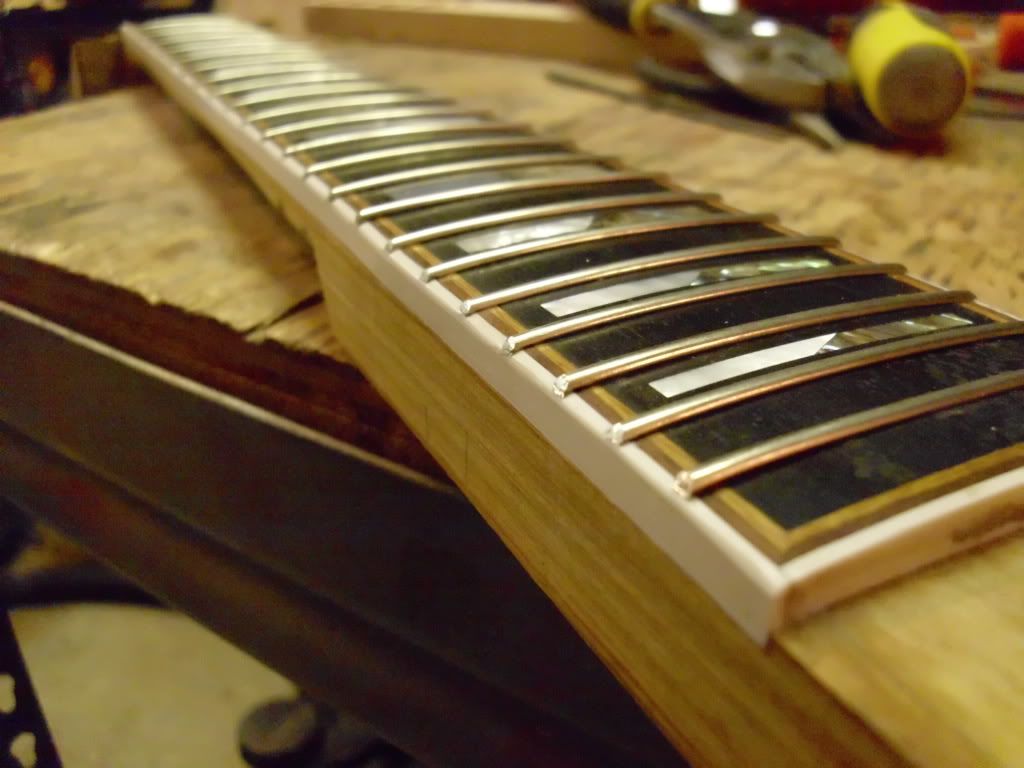 Those ends will need to be cleaned up, but I'll explain that later. |
|
|
|
Post by avengers63 on Jul 10, 2010 17:23:33 GMT -6
 The next step is leveling the frets. This is NOT a step that should be rushed. The frets are in and they should be pretty darn close to level, but they're not there yet. If they're not, the playability of the neck will be greatly hampered and the action could end up being REALLY high or you could get a ton of string/fret buzzing. You might even end up with notes that simply will NOT fret correctly. The question is why. When a string is fretted, it needs to clear the rest of the frets up the neck. We also want the strings to be as close to the neck as possible for ease of playing. If some are higher than others, the geometry will be off and the strings might not clear a higher fret. The only real solution to this is raising the action or filing down the offending fret. But what happens if you accidentally file the offending fret too far? Right - a domino effect with every fret up the neck. Scared yet? Good. Take your time and do it right. Fortunately, the mechanics of the operation are pretty simple. What you'll need is a reliable, flat sanding block of some sort, some 600+ grit sandpaper, a black Sharpie, and a good long straightedge. There are a LOT of options you can use for the sanding beam. Stew-Mac, LMII, and others will be happy to sell you a precision ground aluminum sanding beam or file for an unreasonable amount of money. As cheap as I've shown you that I am, I'd happily buy one if I could afford to drop $68 on a one-trick pony. Maybe someday I will. Until then, I use my radiusing block and a roll of adhesive backed 600 grit. 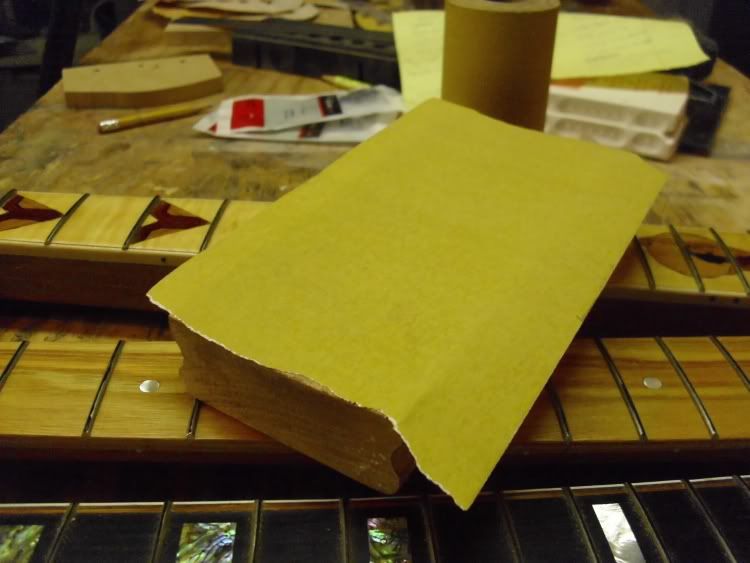 It's not as long as I'd prefer, but it gets the job done. (Insert crude joke here. ) Here's the three-step process: 1) Mark up the top of the frets with the sharpie. Make sure you cet it across the highest point of the crown. A little down the sides is good too. 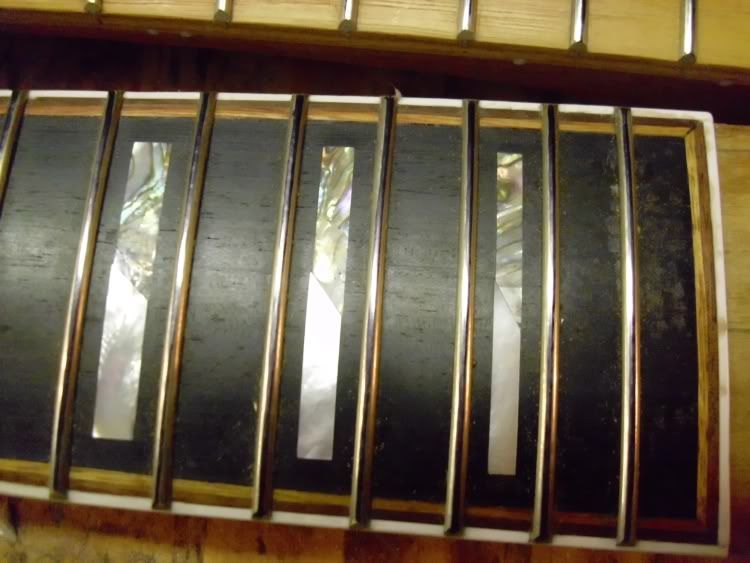 2) Slowly and with even pressure both across the width and as you go, make ONE swipe along the frets with the sanding beam (radius block). Go the entire length of the fretboard in one motion. Continue this until you can see that all of the sharpie is gone from the crown of ALL of the frets. 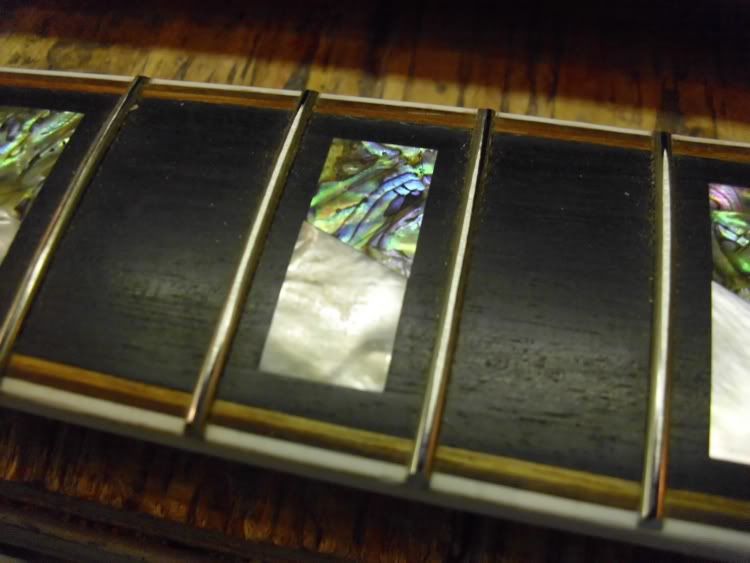 3) Position the neck between you and a light. Place the straight edge along the frets and check for daylight. You'll need to slowly run it across the arc of the fretboard to check the whole thing. Ideally, you don't want any gaps at all, anywhere along the neck. This probably won't be possible, but you can get closer than you think. If there are any low spots, mark them somehow and repeat steps 2 & 3 until it's gone. Since I started using the fret press with the hammering block, I haven't needed to take more than a handful of swipes with the sandpaper, and never had to repeat the process, and never had to re-crown the frets. If you hammer them in without the block, you will most likely have to do some serious leveling, and then re-crown the frets afterword. And I'm not going to tell you how to re-crown them because I've found out how to avoid it  |
|
|
|
Post by avengers63 on Jul 10, 2010 17:35:22 GMT -6
The last thing to do is dress the ends of the frets. All you need is a small detail file. This is the one Stew-Mac sells for $18-$34.  Or you can get a set of files from Home Depot for $16. If you go the cost-effective route, you'll need to modify the files. Grind off the edges so that they're rounded off & smooth. This is so that WHEN, not IF your file slips you won't damage the fretboard. 1) File off the rough ends. Run your finger from the side of the neck around the edge of the fret. If you feel anything rough, jagged, etc., file it away. 2) Smooth over the edges of the bevel. You can take this to whatever extreme you choose. You're the one playing it, so if it's comfortable to you, then it's perfect. The leveling process might have left the top of the fret a touch rough. You can GENTLY buff this out with the file. Be super careful about how much material you remove if you do this. |
|
Deleted
Deleted Member
Posts: 0
|
Post by Deleted on Sept 11, 2010 14:51:00 GMT -6
Hey what happened to this build???
|
|
|
|
Post by avengers63 on Sept 11, 2010 16:52:26 GMT -6
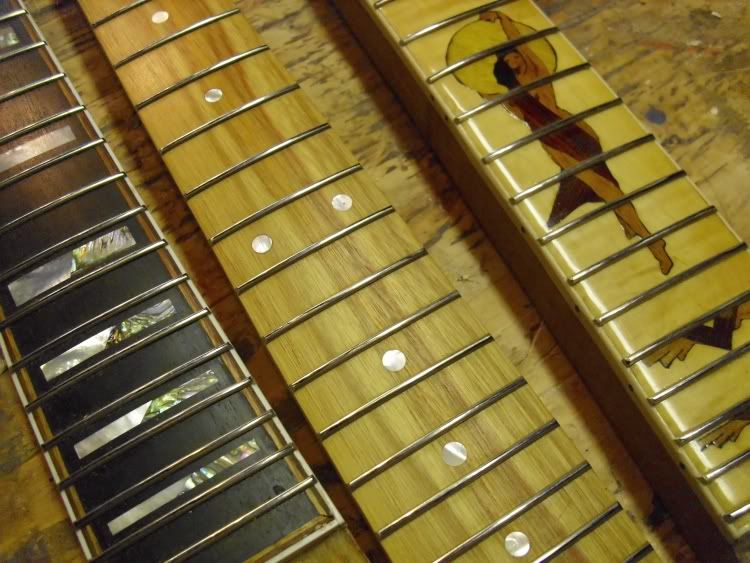
All of the construction is done. All that was left was to do the finishing, glue the neck in, and do the assembly/wiring. doing the finish would be a thread all to itself. To the best of my knowledge, the rest has been covered already. Say the word if y'all want the how-to on the remainder. 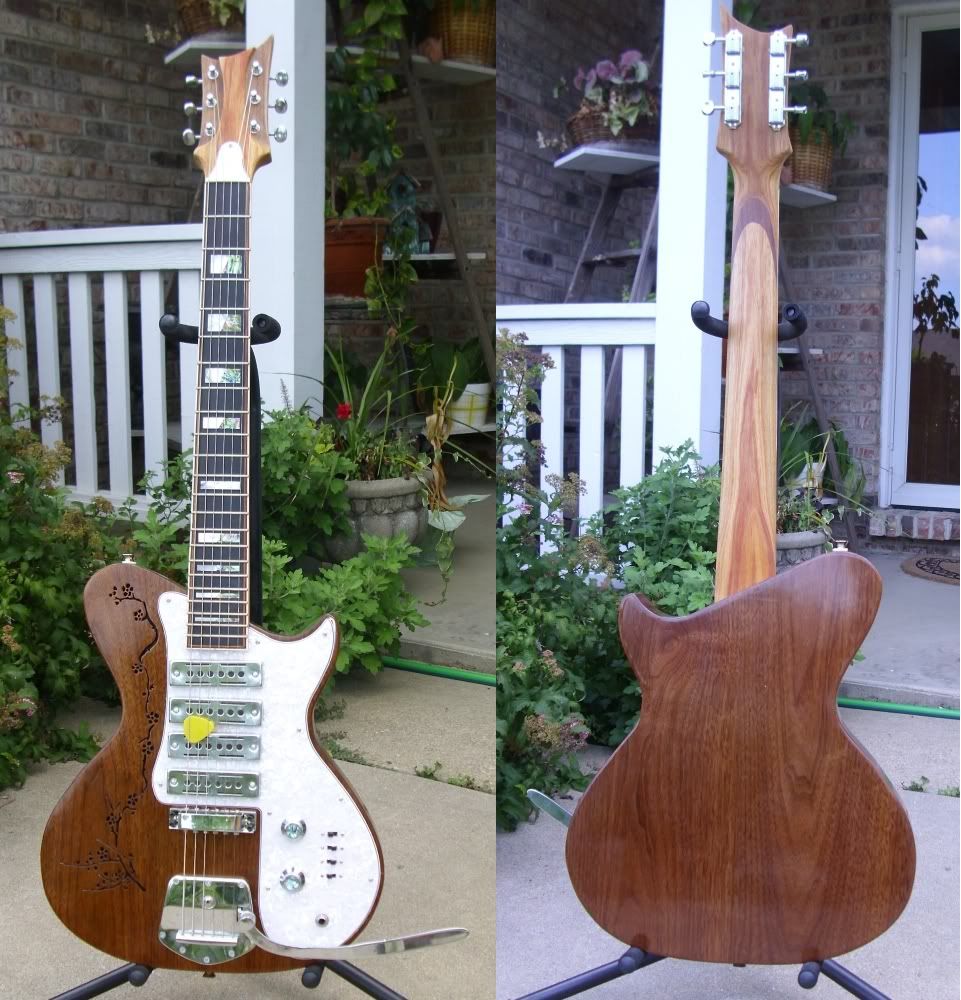  |
|
|
|
Post by wirewrapper on Sept 11, 2010 17:17:49 GMT -6
Absolutely Awesome! My hat is off to you again!!
|
|
Deleted
Deleted Member
Posts: 0
|
Post by Deleted on Sept 13, 2010 15:27:58 GMT -6
Yes that is one cool looking guitar! It really came out great! Does it play and sound as good as it looks?
EB
|
|
|
|
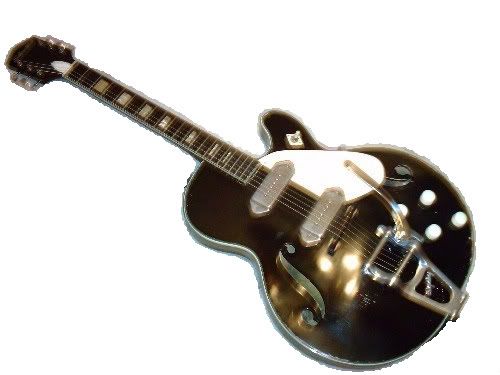
Post by avengers63 on Sept 13, 2010 16:27:27 GMT -6
It's one of my favorites, along with the headless V and the mirrored Iceman.
It's heavy enough to know you're holding something, but light enough to still be comfortable. The Teisco singles are just plain KILLER!!!!!!! Their snap & bite combined with the chambered walnut are just a beauty to hear. It's very well balanced tonally.
I've found with a couple months of use under my belt that I almost never use the pup 2nd from the neck. It's really muddy, with neither the warmth of the neck pup nor the bite of the bridge. Even combining it with another pup just brings that one down into the sludge.
|
|
|
|
Post by shattered on Sept 14, 2010 10:33:55 GMT -6
Dude, that's AWESOME!
|
|
|
|
Post by crowhue on Jul 4, 2011 2:46:25 GMT -6
A little while ago, i asked if anyone would be interested in a detailed tutorial on making a guitar from scratch. Y'all gave me an emphatic 'yes', so here we are. All I ask is that for this thread, you hold all comments resembling "looking good" and "I can't wait to see it finished" and the like. This is not intended to be a normal "showing off' build thread, but a step-by-step tutorial. PLEASE ask any questions you might (and will) have about the process. I'm likely to either gloss over something or skip it entirely. I don't want to do y'all the dis-service of missing something. Cool? Where did you learn all this stuff from, out of interest? |
|
|
|
Post by cknowles on Jul 5, 2011 14:52:48 GMT -6
Still diggin' that scroll work. crowhue, it is all learned by experience. Over the years I have done a lot of woodworking, I have asked advice whenever I wasn't sure how to proceed, then learned what works and what doesn't. What I learned in woodworking translates to instrument making with some minor modifications in technique. Many projects never saw the light of day, not that they were failures, but that they were learning experiences of how Not-to-do-it. Everyone of us has got where we are with building by learning from our mistakes, and when we have been really fortunate, from the mistakes of others. Chris |
|
|
|
Post by avengers63 on Jul 5, 2011 15:19:38 GMT -6
Chris is dead-on. There are plenty of books and on-line resources that will explain how to do whatever you're trying to do. But to know how to do it, ya gotta get in there and do it. You'll fail more than you succeed at first, but that's all part of the learning curve. Ya just gotta start with the easy stuff and work your way up from there.
|
|
|
|
Post by Sam on Nov 5, 2012 14:46:07 GMT -6
What about finishing the headstock?
|
|
|
|
Post by siblingchris on Nov 18, 2012 6:09:48 GMT -6
That's one awesome looking guitar. Hope it plays as good as it looks  |
|