|
|
Post by avengers63 on May 18, 2010 9:34:11 GMT -6
As I've said before, here is where I'm really deviating from my normal procedure. This is because of the very real possibility of the neck wood moving after it's carved. Normally, this is where I glue on the fretboard. After that, I do the inlays, cut the taper, radius the board, install the side dots, and install the frets. After all that is done, I'll carve the back. I do all that before the carve so that I have a flat & square back & front to work with. Why is that important? Rout an inlay cavity onto a curved surface. Set an item with rounded sides on it's side and make it stay there. Pound on an item with a hammer that's not fully supported underneath. Mark a center line, then cut it and see if that center line is EXACTLY where it was before. It can't be off by even 1/32" for the inlays. So why can I get away with it on this one? Mostly because of the fretboard. It's already tapered, inlaid, and radiused. The other items I'll just have to work around. I'd still rather not have to do it this way, but the wood demands it to be so. The taper itself needs some explanation. The string spacing gets wider as you progress up the fretboard. This is because the bridge is wider than the nut. The neck needs to follow that widening. You'll need to make a template for the taper. This will be stuck to the neck and used to rout with. Draw out the entire string area full sized. Mark a straight line matching the scale length. On one end, mark the width of the string spacing at the nut. On the other end, mark the spacing at the bridge. Connect the dots and you'll have the taper of the two E strings. Mark a line 1/8" wider than the strings themselves. This is the outline of the neck from the nut to the bridge. Make a template from this drawing. The edges HAVE to to 100% straight. A jointer is your friend. When you have the template, make sure to mark the center line and where the nut & bridge are. It's useful to continue the center line around to the back. Write on it the scale length, nut string spacing, and bridge string spacing. You can then use it later without wondering what it was for. No, you don't REALLY need to have the template be the full length from nut to bridge. It can be more useful that you realize, but it's OK if it's cut off 3"-5" past the 24th fret. You want that extra for a set-neck tenon. Line up the template on the neck. Match up the nut on both the template and the one marked when doing the truss rod. Match up the center lines. This is why you extended the center line down the face of the headstock - you routed through the line at the nut. Mark the outline of the template with pencil or sharpie.  Then take it to the bandsaw and rough-cut to the line, making sure not to go over it.  From there, attach then template where you marked it with double-stick tape and route to the template. Sorry - no pic of this step. |
|
|
|
Post by cknowles on May 18, 2010 18:43:32 GMT -6
Very cool man, keep going!
Chris
|
|
|
|
Post by avengers63 on May 18, 2010 20:29:53 GMT -6
Not to toot my own horn too much or to suggest that I'm the be-all-end-all of knowledge, but...
It might be worth the effort to have this topic pinned for future reference.
|
|
|
|
Post by avengers63 on May 19, 2010 8:37:13 GMT -6
The thickness of the neck greatly effects the overall shape and feel of it in your hand. It also effects the strength. It's a balancing act with no solid answers. It's critical to leave enough material underneath the truss rod so that when you crank down on it, there's no real risk of it popping through the back. It's also critical to make the neck thin enough to be comfortable in your hand, and small enough to easily wrap your fingers around it while playing. As I mentioned already, there are no hard-and-fast rules for how to do this. Most companies have their own shapes, and none of them are wrong. It's all a matter of personal taste. I'm not a small man: I'm 6'4" and have HUGE hands. I can reach 18 keys on a piano, and effectively play to the 16th. That's an octave + 2 notes. large, wide neck is very comfortable to me. This reminds me of the point about nut width. String spacing at the nut has a HUGE impact on the way the neck plays and feels in your hands. If you're unfamiliar with what size is best for you, go to the store and play some guitars with different width nuts. You'll be amazed at what a difference just that one aspect will make. For me, 1/16" is the difference between playable or not. OK... back on topic. The neck gets thicker as you go up the neck. (Honestly, I don't know why it does that, but it does. They've been making them like that basically forever, so I'm going on blind faith that there's a good reason for it. Until I find out conclusively otherwise, that's how I'm doing it.) It isn't by very much, but the taper is there and is noticeable. When I plot out the thickness taper, I start with marking the depth of the truss rod channel on the edge of the neck. It's better for me to have a visual than to imagine it. I'll then measure the additional thickness under the middle of the 1st fret and then the final thickness a fret or two in front of there the heel is. Connect the dots and there's your thickness taper. The absolute MINIMUM thickness of material you want under the t/r channel at the 1st fret is 1/8". I'm a bit paranoid, so I like to go thicker - 3/16". I've gone to 1/4" before, but that's just too thick, even for my hands. I like to have it increase by 1/8" by the time I'm at the 15th fret or so. Here's my taper marked out. 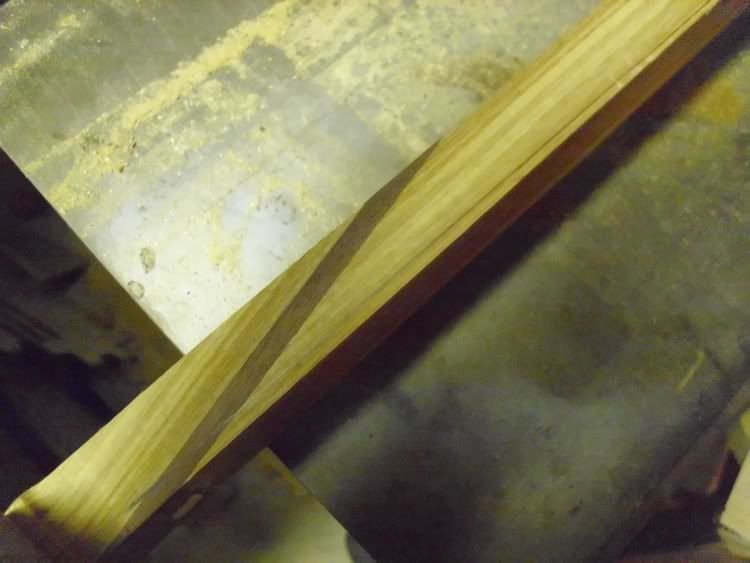 When you take it to the bandsaw to cut it, there are a couple of things you'll nave to be aware of. First, don't take the cut all the way to the nut area. You can shape that by hand later. You want as much material under the t/r access area as possible. Second, it's likely that the headstock is wider than the neck itself. This will prevent you from having the neck flat on the table through the entire cut. WARNING: I've not mentioned too much about tool safety to this point because I'm trusting that you're have some sense in your head. Also, I'm not publishing this, so good luck suing me if you do something stupid with your tools. But here I AM going to warn you. Unsupported cuts on the bandsaw are VERY DANGEROUS. Be EXTREMELY careful when you make that cut. If it just plain scares you to make that cut with the bandsaw, don't do it. Get a coping saw and cut it by hand. The bandsaw will make the unsupported wood jump, making you jump, then your fingers are in an ice bag on the way to emergency surgery.When you make the cut, do NOT hit the taper line. Cut a hair outside it. When you smooth and carve the neck, material and thickness will be lost. Make allowances for that. |
|
|
|
Post by avengers63 on May 19, 2010 9:00:35 GMT -6
I plotted out on the back of the neck where it will join the body. The rough carve will stop shy of that point. When the shape is finalized, I'll finesse the whole thing into shape and do that area at that time. But that's later. Right now, we have to do the basic shape on this beast. To shape the neck it's all done by hand. You'll need rasps, files, a spokeshave, or some combination thereof. In the final shaping, I use calipers, a straightedge, and a contour guide for accuracy. Experiment with the tools and find what works best in your hands. For the initial parts, I use a rasp-like tool called a MicroPlane. 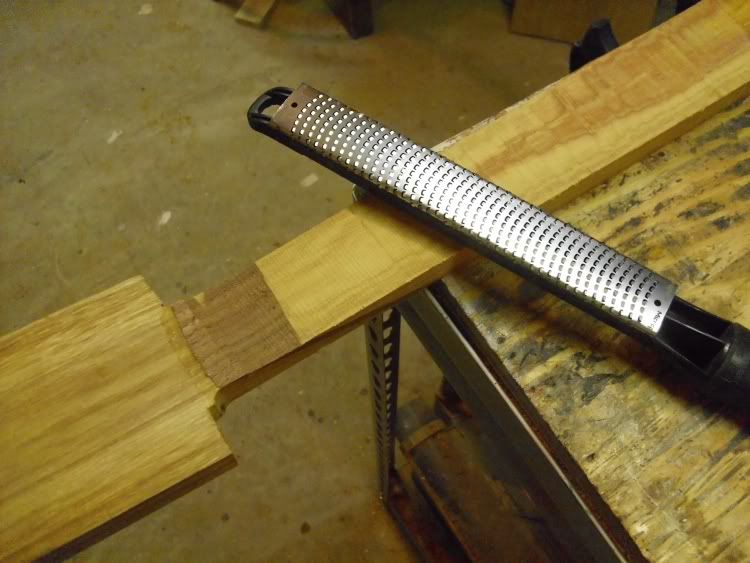 I'll use the rasp/file/plane to round over the neck right about at the 1st fret line. 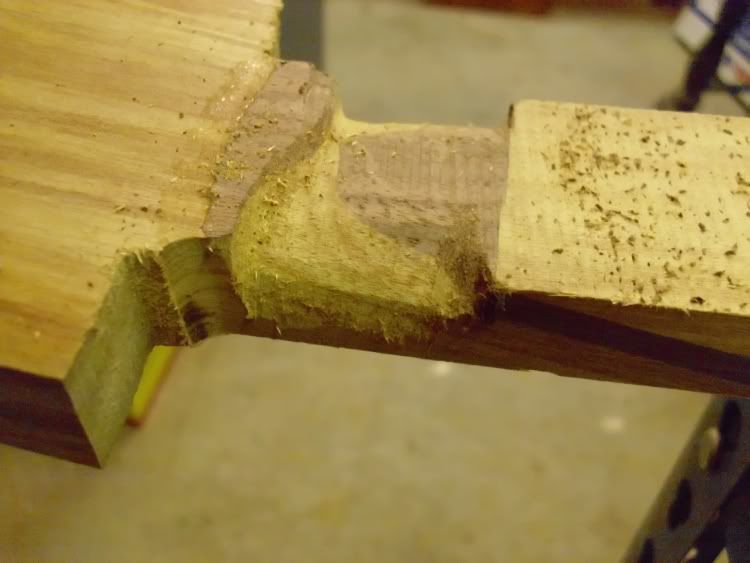 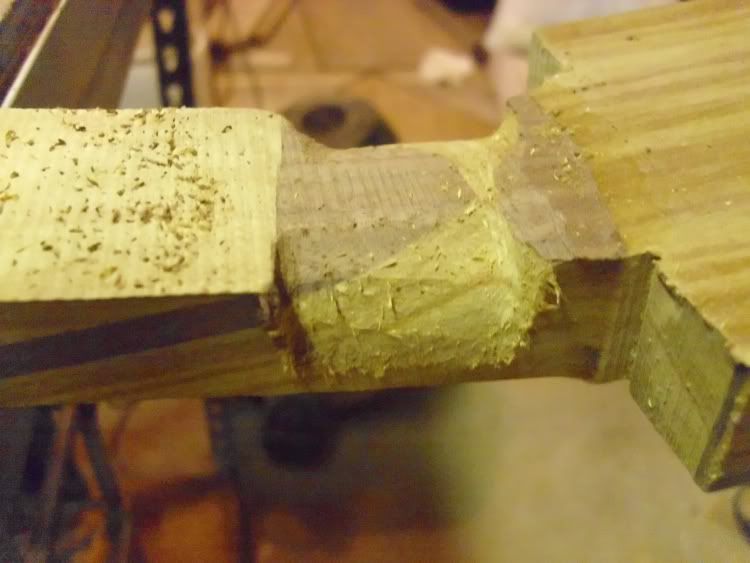 Be careful not to take any material from the back of the neck. You'll be tempted to , but resist or you'll flow through into the truss rod channel. You'll also be tempted to get close to the final shape. Don't. Right now, it's just like the rough cuts on the bandsaw. It'll be cleaned up later. Notice also that I didn't go all the way to the front edge. I need to keep that EXACTLY where it is so the fretboard can be glued on perfectly in line with the taper. It'll get cleaned up in the final shaping. With the first one done, I then do one near the end of the taper, and one about halfway in between. 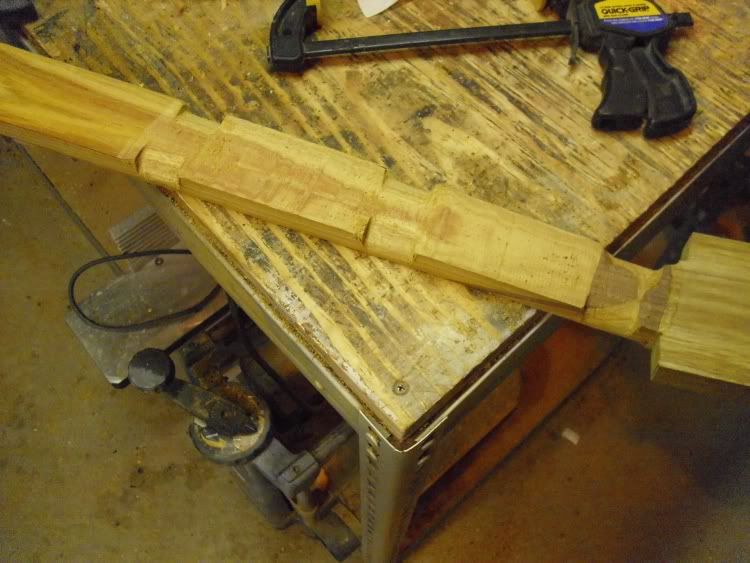 From there, we connect the dots. I take it outside and clamp it to the banister coming down from the deck. I've tried clamping it to the bench and wedging it into other places, but this is the most comfortable for me. It has the neck at a good chest height and at a good angle for pulling on the spokeshave. 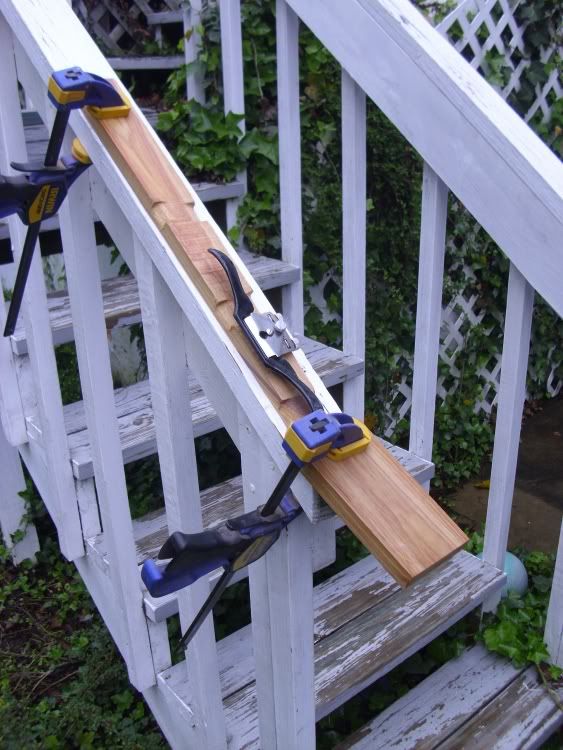 I'll knock down the edges with the MicroPlane. It's a LOT faster than planing it away with the spokeshave. 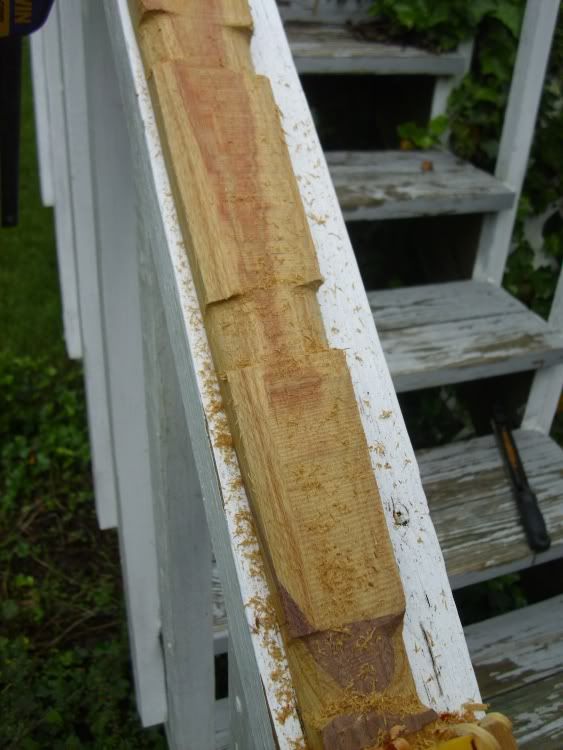 A word about the spokeshave here. It's a specialized plane, similar in function to a drawknife but with a lot more control. It's used to carve round surfaces by hand. You'll have to play with it for a while before you get a really good feel for it. The one thing I'll tell you is to ALWAYS fo with the grain rather than against it. If you go against the grain, you'll get tearout that will be a PIA to get out and might cause irreparable damage to the shape. Yes I know this from personal experience. Now you don't HAVE to use a spokeshave. You can do the whole thing with a rasp.I, and many others, find it easier to use the spokeshave. Like I've said many times, experiment and see what works for you. So anyway, you're going to connect the dots here. First on one side... 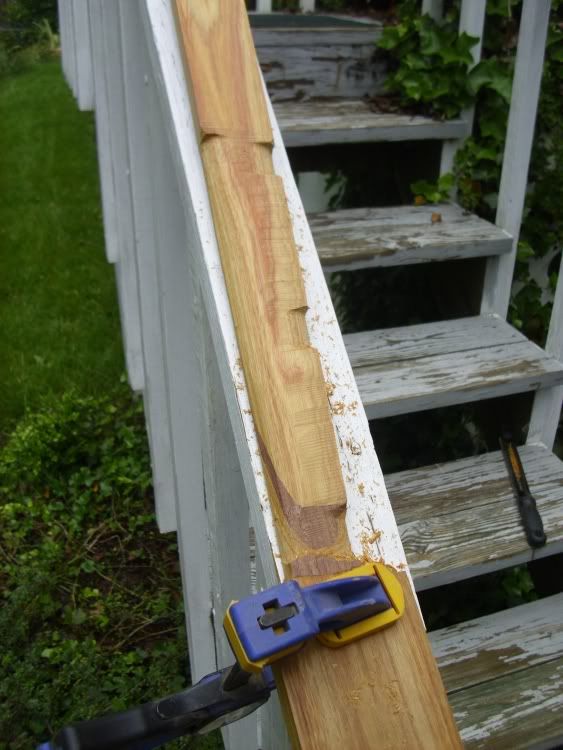 then on the other. 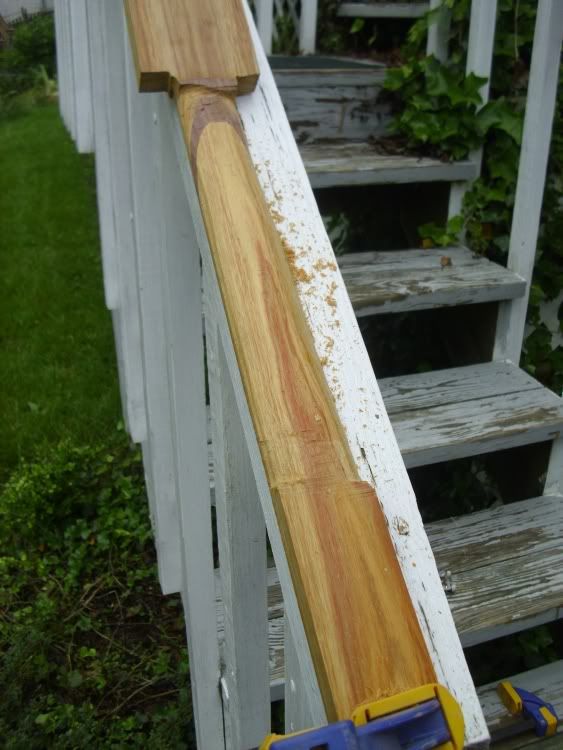 And that's where I'll be leaving it for a while. It'll be sitting on the shelf for about a week so I can see if the wood is going to move or not. If it doesn't move, I can glue on the fretboard. If it does, I'll have to start from scratch. |
|
Deleted
Deleted Member
Posts: 0
|
Post by Deleted on May 27, 2010 18:26:24 GMT -6
Hey looks like I missed out on a lot! Cool stuff!
|
|
|
|
Post by avengers63 on May 28, 2010 16:10:04 GMT -6
There's been a 9-day delay up to this point. A lot of it was waiting to see if the neck was going to move or not. Once I decided that it wasn't, I had to do some work on it that wasn't really important to the general tutorial. Still, you deserve to know what was going on, so here's the simple version. Since this is a thinline, I wanted an F-hole. However, being who I am I didn't want a standard, generic kind of F-hole. I talked to some folks about what I was doing and someone suggested I do something reminiscent of the floral engraving Teisco did on some of their pickguards. This landed me on a Japanese cherry blossom pattern. 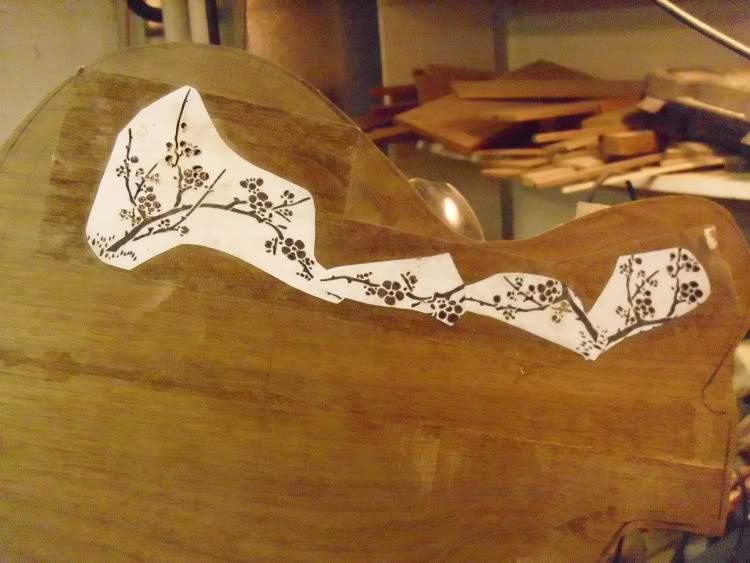 A little re-working of the pattern and two days with the scrollsaw gave me the cuts, Gluing on the top, routing it to the body, and rounding over the edges gives us this: 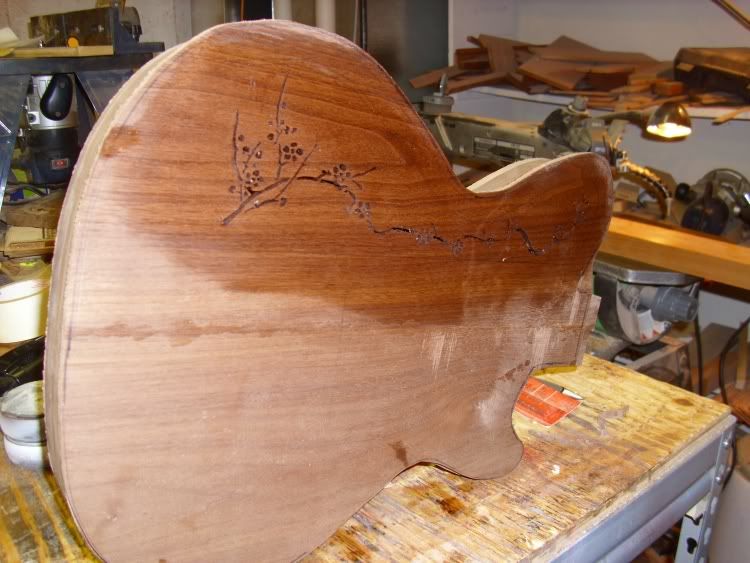 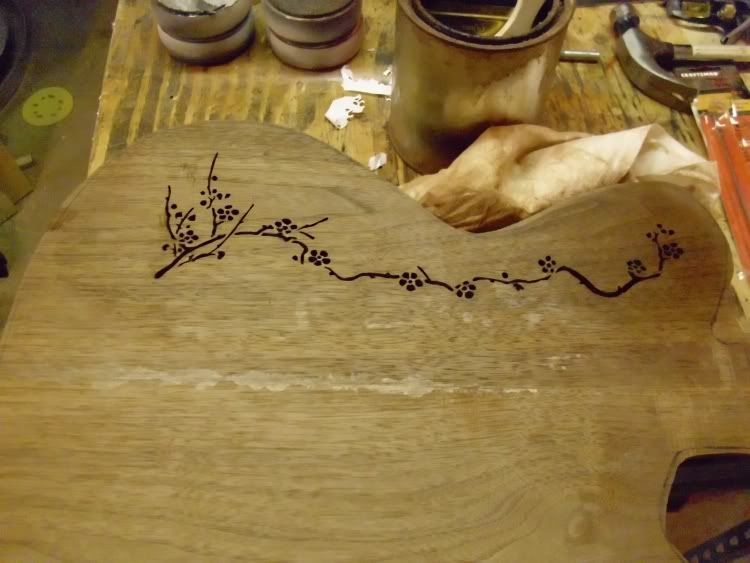 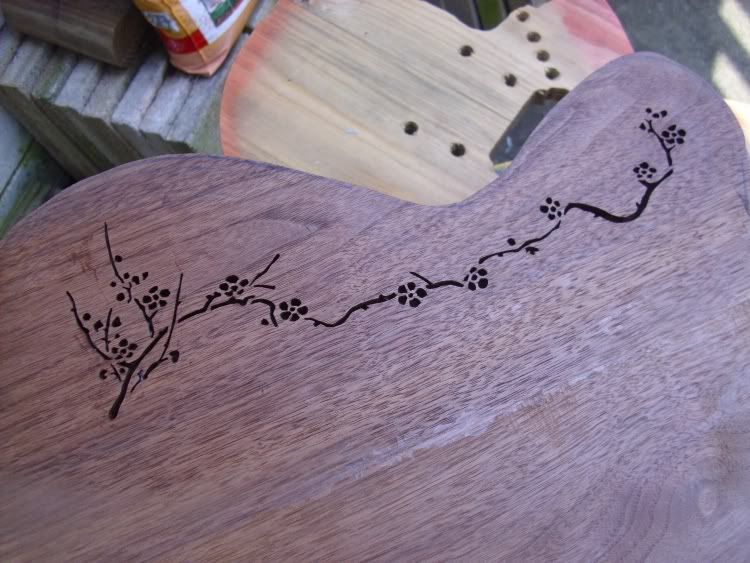 I might have mentioned before that the fretboard was too narrow and would need to be widened out. I had to wait until I knew if I was going to be using the canary neck or not nefore doing anything. Once I confirmed that it was good to go, I cut & planed walnut & canary strips to 1/16", then glued them rogether, and then to the fretboard itself. This ties visually to both the neck and the body. This will in turn be bound in white to tie to the pickguard. 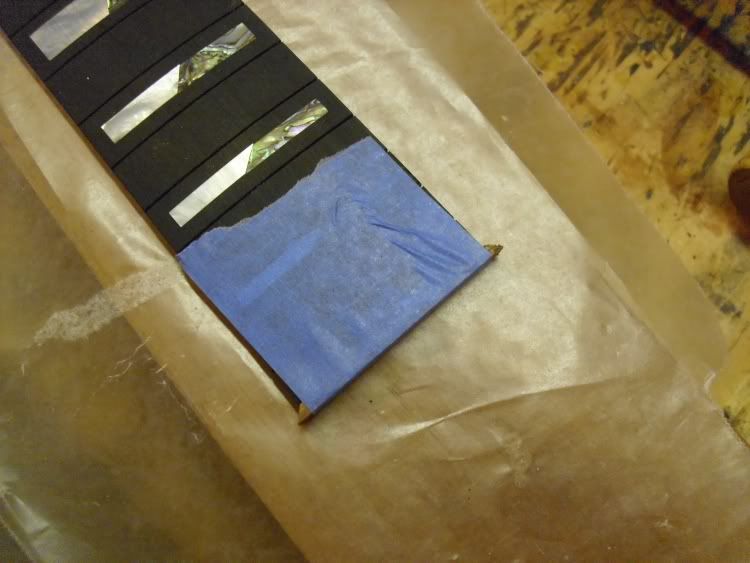 just a shot of the body & neck together 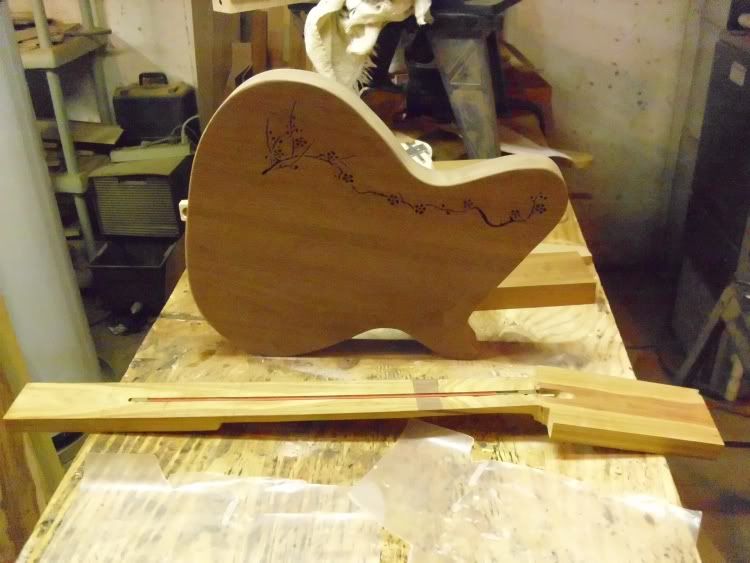 Here's the pickguard template I made, along with all of the hardware sitting roughly in place. I'm not 100% happy with the p/g shape, so it'll be getting tweaked before cutting the real thing. LMK if you want more info on how I made the template. 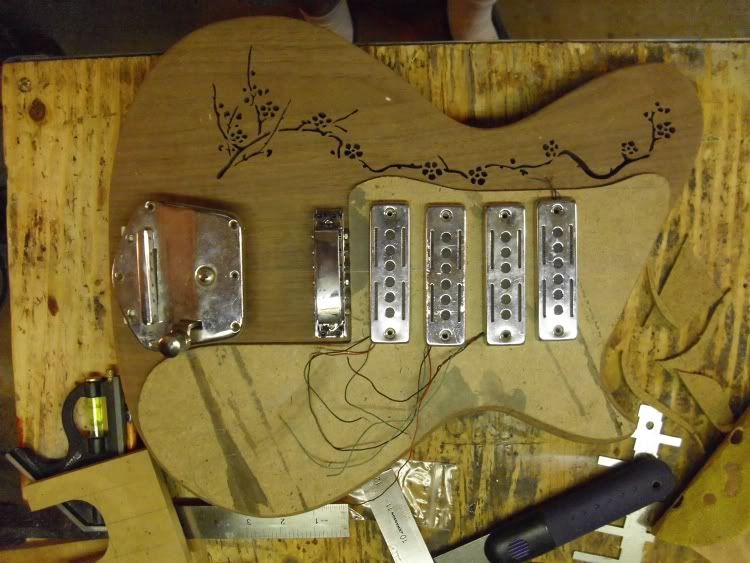 I have a lot more done than this, but it'll be next week before I can do the write-ups. |
|
|
|
Post by avengers63 on May 29, 2010 8:10:54 GMT -6
Not that it's not important to do all of the steps right, but this one stage can make or break your guitar. If it gets dorked up, you can ruin the looks and playability of the whole thing.
There are two main types of neck joint you can use: bolt on and set. There are arguments as to which is superior along with all of the "facts" backing them up. It's mostly voodoo and opinions. Whichever one fits into your concept of what YOU want YOUR guitar to be is the best one.
There is a third option - neck-through construction. That's a completely different beast with it's own issues, and would require a separate tutorial.
There ARE pros & cons to both a bolt on and a set neck. Again, neither is wrong, just with their own particulars.
A bolt on is by far the easiest and most forgiving. There is play in the neck pocket, so the routing doesn't need to be as precise. Though not much, this play allows you to fine-tune the alignment with your bridge placement. You can also shim the neck should the action be too high or too low. Then neck itself can be completely finished separate from the body at any time. The main drawback is that the heel is large and can be in the way if you have small hands, as well as potentially limit upper fret access.
A set neck needs to be dead-on before you glue it in, so it takes a lot more planning and preparation. The neck pocket needs to be very snug - tight enough to hold the guitar up by the neck without using any glue. Once it's glued in, it's in for good, so you HAVE to have everything pre-fit and given a thorough test-run beforehand. Many things, like the exact bridge placement, can't be done until the rout is done and everything can be tested. The major advantage is upper access. Without the bolt-on tab on the body, the upper fret access is significantly improved, The glue point can easily be contoured for a smooth, comfortable fit.
For this build, I'll be doing a set neck. I personally have no problems with a bolt on. In truth, a bolt-on would have fit the theme and inspiration of this guitar very well. I simply wanted to experiment with a PRS-style neck joint. This has created an issue I did not foresee which will be discussed later.
|
|
|
|
Post by avengers63 on May 29, 2010 10:01:26 GMT -6
When planning out the neck pocket, I personally like to put the last fret even with the deepest part of the cutaway. It just seems best in my mind. Normally, I'd do this when the fretboard is on. In this case, I marked on the neck where the 22nd fret will be. This is good enough for my purposes. If it ends up being off by 1/16"-1/8", I'm OK with it. I also marked both end of the fretboard. When it's time to glue it on, I'll use these to help line it up. 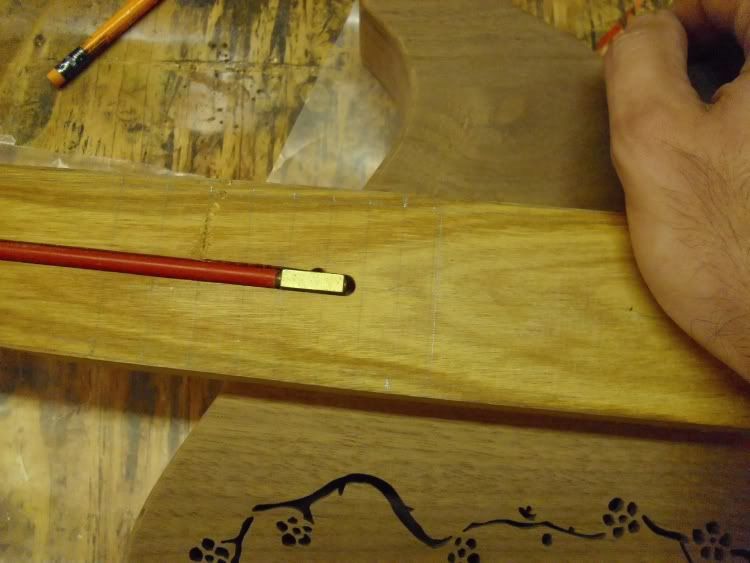 It's pretty simple to make a line from the bottom of the cutaway across the body. I like a combo square for this. 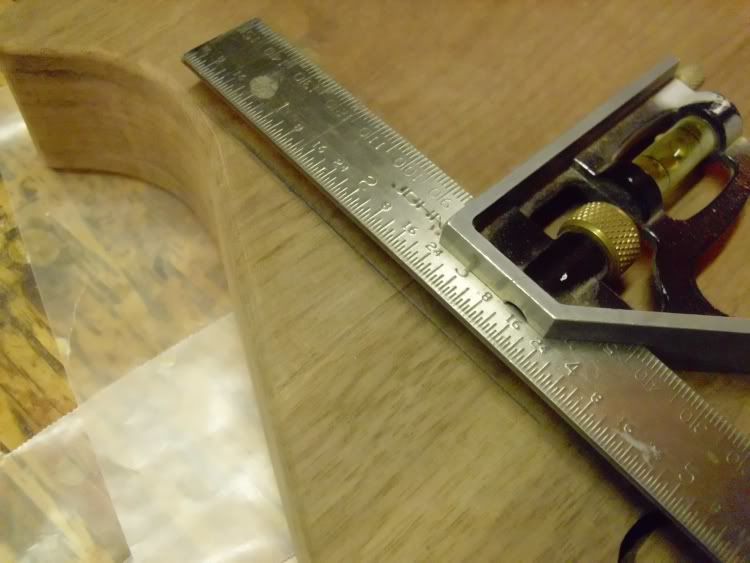 Lay the neck on the body, lining up the center lines on both. Line up the last fret with the lines by eye. Clamp it in place and trace the tenon onto the body.  There are two ways you can cut the pocket at this point, and they both depend on if you'll be doing a set or bolt-on. If you're doing a bolt-on, leave the neck clamped in place. Take three pieces of wood (or MDF or whatever) that are the same thickness and double-sided tape them snug against the sides & end of the neck. These become your routing template. In my experience, the taped pieces can and will move slightly when you rout the pocket, thus giving you that ounce of play you'll need in the pocket. If you're using a pre-made neck, there are templates you can buy for the standard neck pocket. If this is the case, I'd highly advise going in this direction. For a set neck, I like to make a template from MDF that fits the tenon extremely snug. I'll extend the center line and 22nd fret from the neck on to the template and line them up on the body. 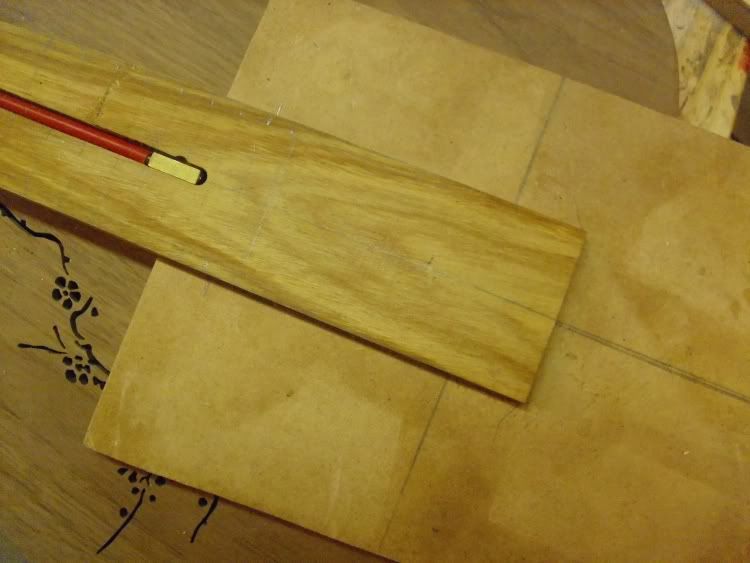 Affix the template to the body and rout. Because the d/s tape can move sometimes, I really tape the heck out of it, and even clamp it in place if possible. 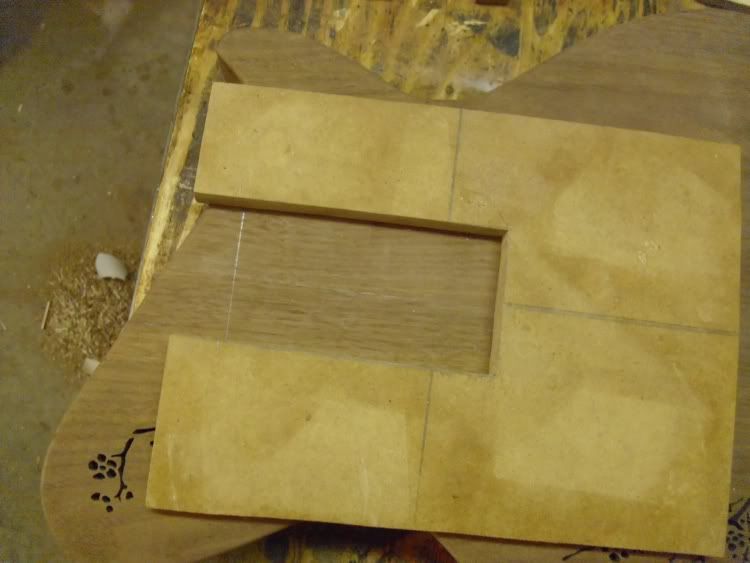 You'll now notice that I screwed up when making the template. It's not ling enough on the bass side.  This will need to be cleaned up later. I extended the line to the end of the body and made for dang sure NOT to rout into that area. A NOTE ON ROUTING DEPTHI've learned not to try and take the neck pocket to the final depth at this point. I've made mis-calculations and had the neck pocket both too deep and too shallow. Obviously, one is easier to fix than the other. In my experience and opinion, it's better to creep up on the actual depth later, when everything is in place and measurable. So with this in mind, I've only routed about half the depth of the neck tenon. When you do the route, the corners will be round. There are two ways to handle this: round the tenon or square the corners. I prefer to square the corners. This is ONLY because I have a corner chisel and I like to find excused to use my toys. ;D 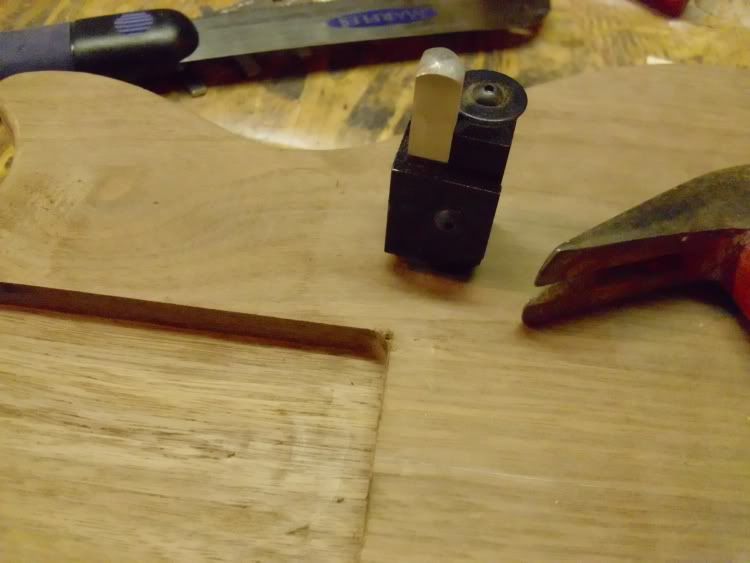 The piece of the corner that the template missed was extended with a flush-cut saw. 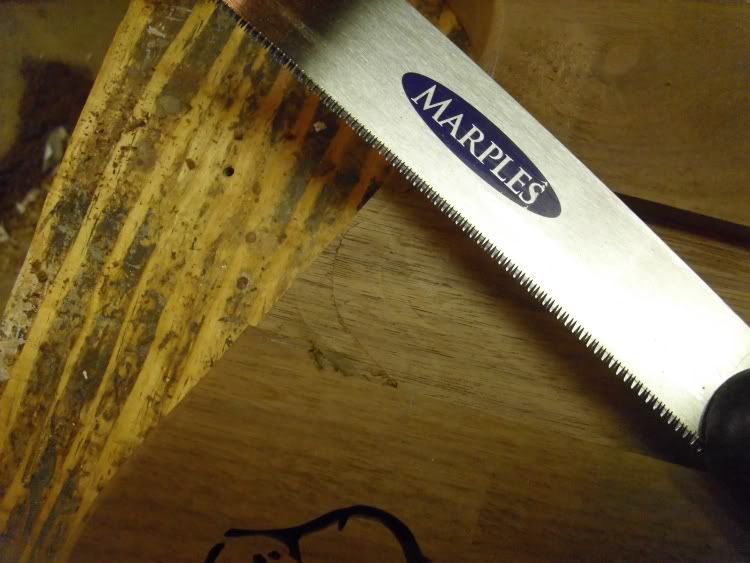 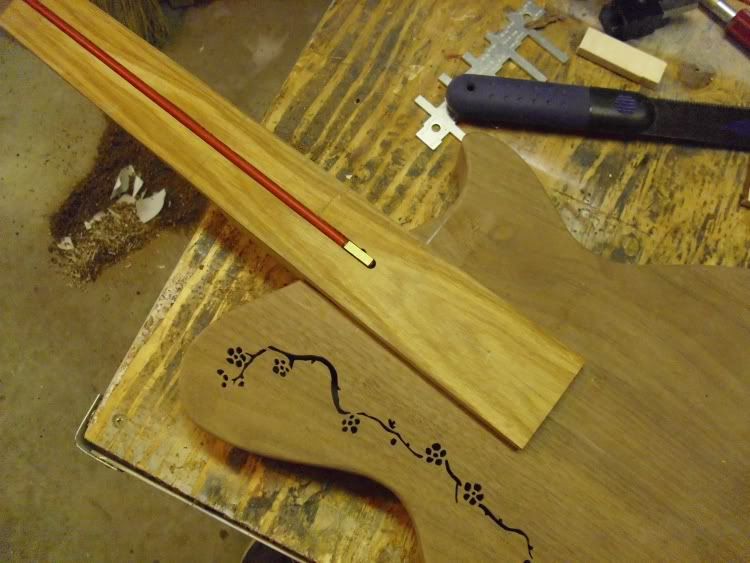 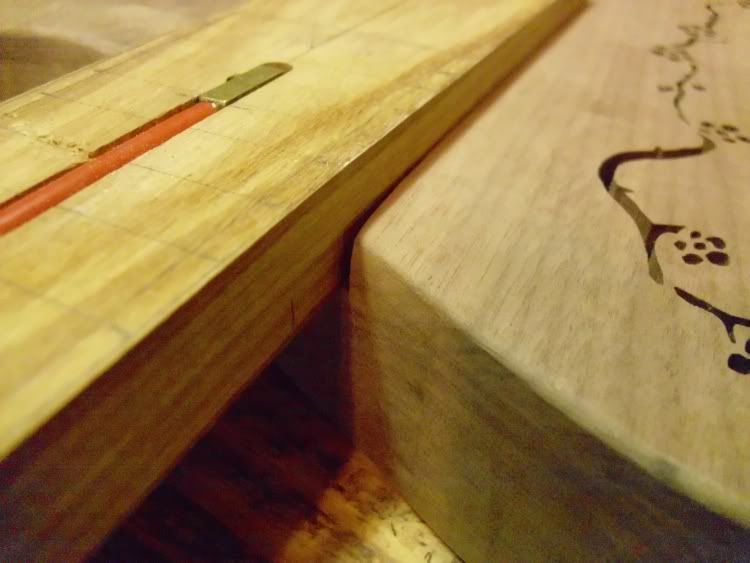 You can see a small gap where I had to extend the pocket with the saw. No big surprise. It's small enough that it might not matter, but it really should be filled in. I'll bulk it up with some walnut veneer. This is yet another example that you're not a machine and you WILL make some mistakes. Don't get down on yourself. You're human - get over it. Handling them properly is part of the process. At this time I also mark the back of the neck where the edge of the body is. This will become a reference point when I finalize the shape of the neck. 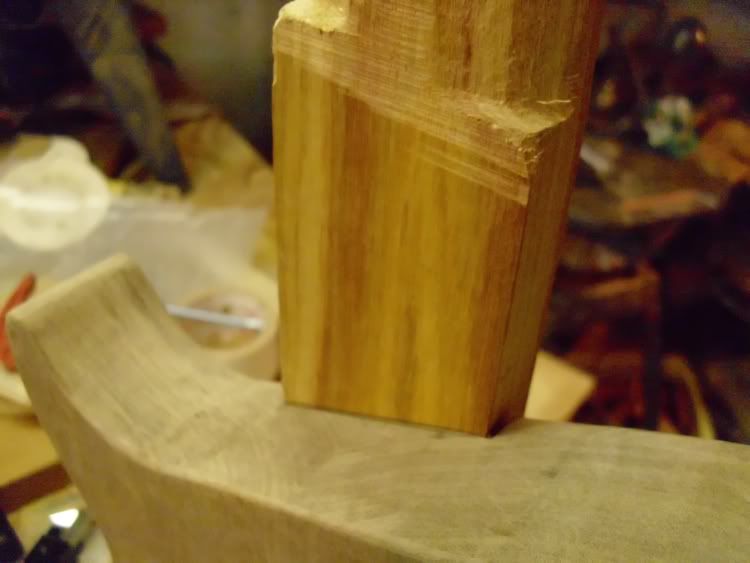 |
|
|
|
Post by avengers63 on May 31, 2010 18:00:26 GMT -6
Even though this particular fretboard is already inlaid, I can still show you how to put dots into your own home-made board. It's very simple: drill a hole and glue in the dot. This can be done before or after the fretboard is glued on. I personally like to wait until after. I'll sand off and re-establish the center line, just in case it might have moved during the glue on. 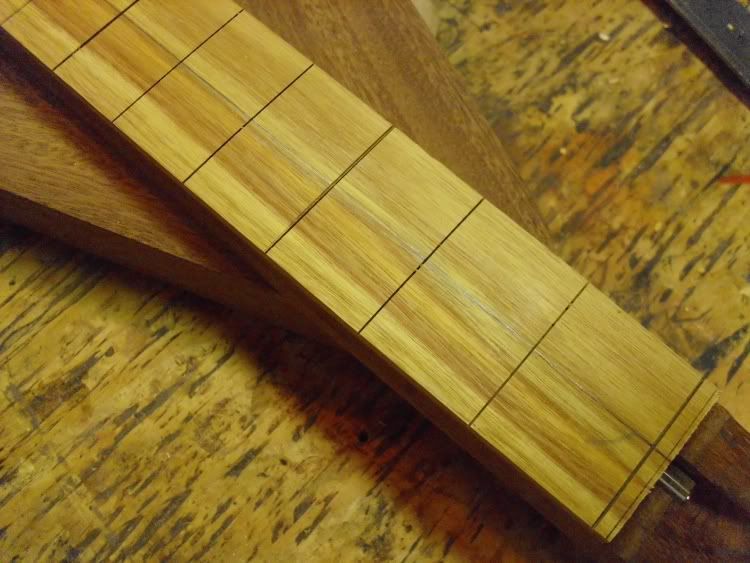 Finding the exact center of each fret is then one line, drawn diagonally from one corner to the other. This line will bisect the center line. For the 12th and 24th frets, you'll need to make an X. 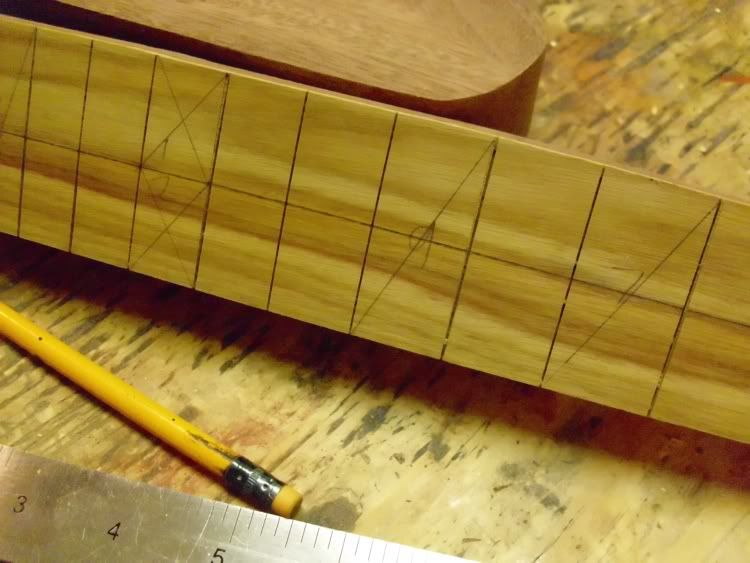 Mark on whichever drill bit you choose the exact depth of the material you're using. You should use either a brad point bit or a forstner. either will give you an acceptably flat hole. These bits also have a fine point that will make it easy to hit your drill point dead on. It should go without saying, but.... use a bit the same size as your dot material. 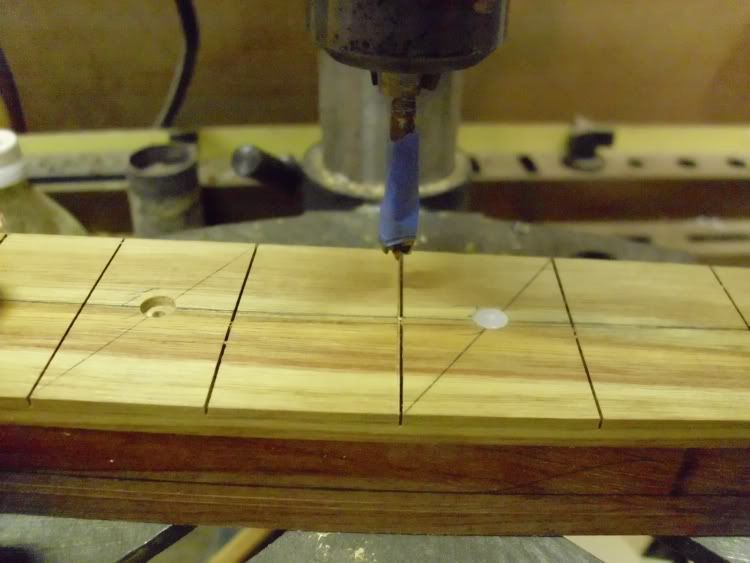 Once all the holes are drilled, you just glue them in with super glue. Make sure you use enough glue to have some squeeze out. This will ensure that all the tiny gaps are filled. 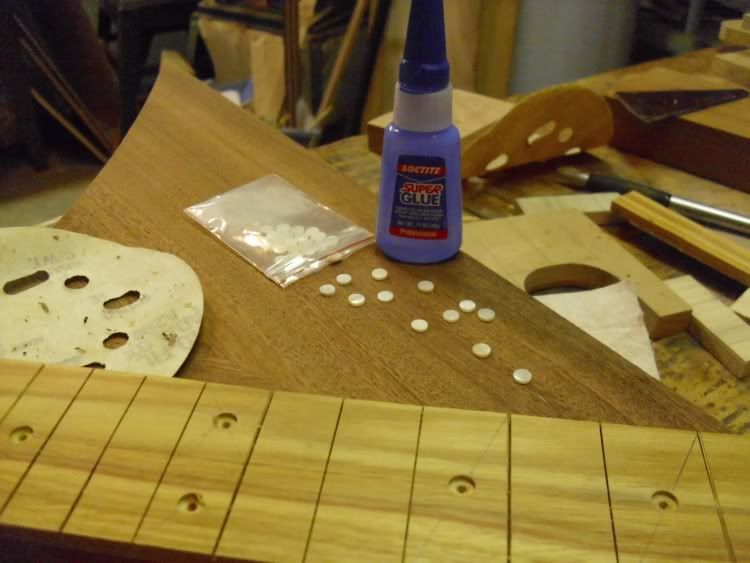 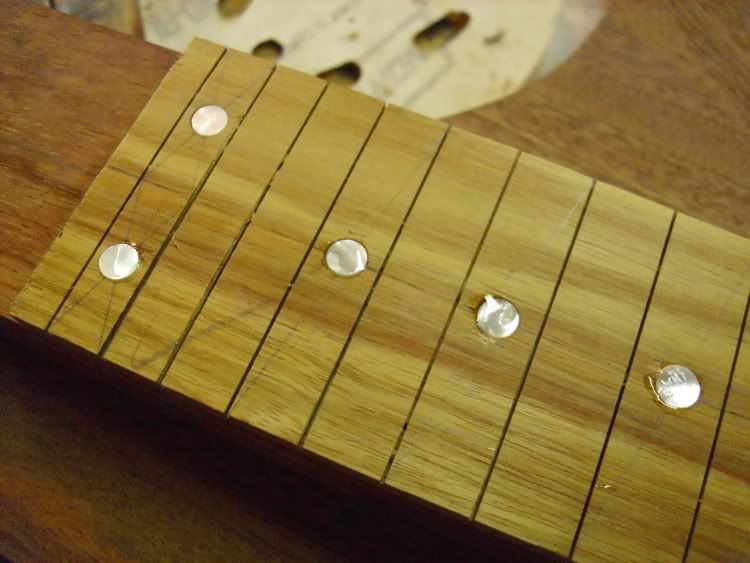 |
|
|
|
Post by avengers63 on May 31, 2010 18:28:07 GMT -6
You should still have the center lines on both your fretboard and neck. You should also have marked the nut placement on the neck. The end of the board will be a helpful mark as well. If these are not in place, do them now. Also, if you need to cut off the ends of the fretboard before the nut or after the last fret, do so now. You have to have a short length beyond the last fret. No more than 1/4" is needed. You could probably get away with less. Then end of the neck can also be cut and shaped at this time if it's a bolt-on. OK... everything marked, cut, and ready to go? 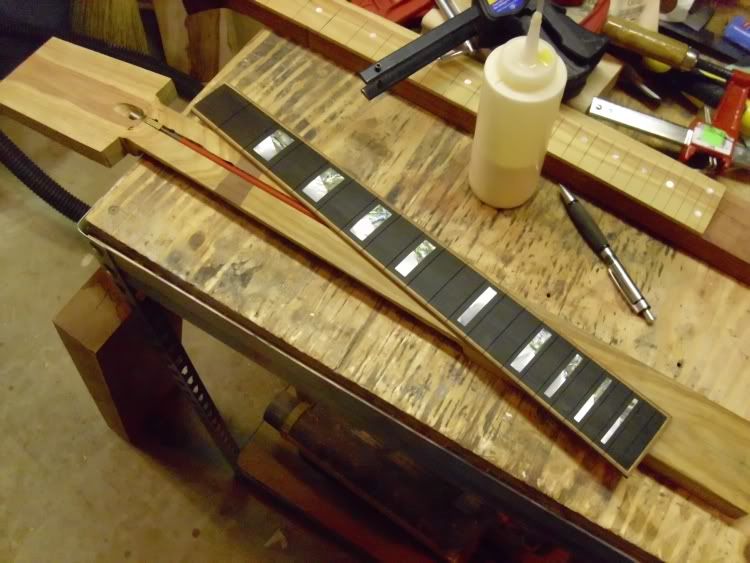 Get all of your clamps and clamping cauls nearby, as well as your rag/putty knife/whatever to wipe up some of the squeeze out. Like any glue joint, the last thing you want is for it to be glue-starved. This can lead to joint failure. It's just not worth it to be cheap with the glue. For a basic guitar, you can get away with having only 2... TWO glue joints: one for the body blank, and one for the fretboard. You can have a drop-down headstock on a 1-piece, bolt on neck. With potentially that few to deal with, take your time and make sure they're done right. Back on target... Lay the truss rod in place, squirt on the glue, spread it out, line up the marks, and clamp the heck out of it. 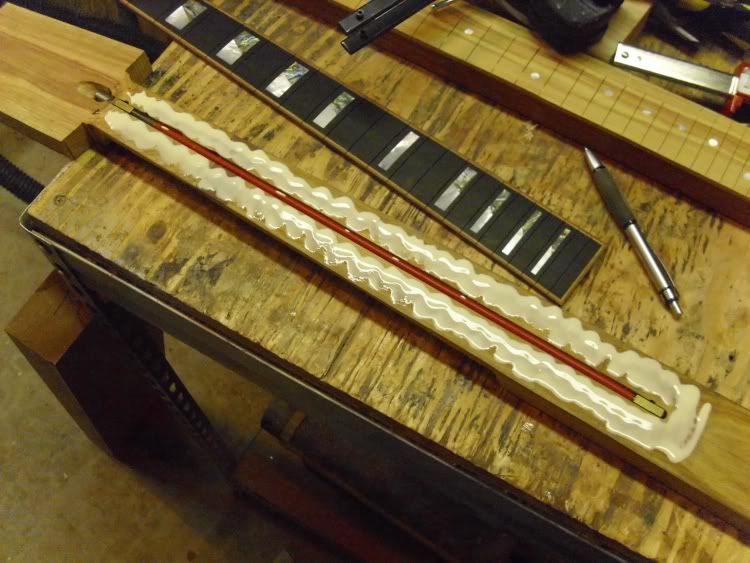  It's better to use some kind of caul on top of the fretboard. The board is only 1/4"-5/16" thick. It isn't anywhere near thick enough to evenly distribute an appropriate amount of clamping pressure. It's really important that the fretboard be clamped evenly. Without going into information overload, it simply HAS to be flat and evenly glued or it can 1) risk coming off and 2) make things harder than they need to be later. Sometimes, I'll just leave something in the claps for a few hours, then start working it again. Though I've never had any issues with that, I won't risk it with the f/b. Clamp it and come back tomorrow to take it out of the clamps. I'm not going to make a separate post on this next step. Mainly.... I don't have any pictures. When it comes out of the clamps, rout the fretboard to the size of the neck. Remember that the taper might or might not have been cut & routed. If it has not, do so after the f/b clamps are removed. |
|
|
|
Post by avengers63 on Jun 7, 2010 14:25:43 GMT -6
NO PICS
If you make your own fretboard or buy one that hasn't been radiused yet, this is the time to do it.
Radiusing the fretboard is a simple, but time consuming process. You also have to take your time with it because if it isn't level or is deeper on one side, your guitar might not play very well.
All you need are some clamps to hold down the piece, a radiusing block, and a good variety of sandpapers.
The radius block can be purchased at most lutheir suppliers, like Stewart-Macdonald or LMII. At the time of this writing, there is at least one eBay seller who has them as well, and cheaper than S-M or LMII. Longer blocks are easier to manage, but more expensive.
I like to adhere the sandpaper to the block with an aerosol craft glue. This makes one less thing to manage while sanding the radius. I then have more attention I can give to making sure I'm staying level & even.
What you're going to be doing is sanding the flat fretboard with a concave block until the board matches the block.
Start with the lowest grit you can find. These are meant for stripping and material removal and therefore will work the fastest. I start with 60 grit, but only because I have a hard time finding sheets of 40 grit. I'd start with 20 if I could find it easily.
The sandpaper will load up quickly, so stop often to clean up the huge piles of dust that will be generated.
The main item I use to track my progress is a pencil. I scribble all over the fretboard: edge to edge and end to end. When the pencil is all gone, I'm almost ready to stop that grit. In the initial radiusing (60 grit), I stop when the pencil is gone, re-mark it, then take off the pencil again. This ensures me that the first marking wasn't just rubbed off, but was sanded off.
Ad I progress through the grits up to 220 or 320, I only take off the pencil once. I'll go another few passes past that, but that's about it. You want to remove as little material as possible as you go through the grits. All you're doing is removing the scratches and grooves the previous grit left.
When sanding the fretboard, there are two things to stay aware of at all times:
1) Do NOT make short, rapid strokes. Use long strokes, starting with the block's front edge at one end and going until the back end of the block is off of the other end of the board. This is a 1-stroke pass only. If you make short strokes, you will make shallow dips and un-even spots in the fretboard. As you should already know, you can't have this.
2) Use an even pressure across the width of the board. You want it to have an radius that is as even as possible. The lowest points on both edges are SUPPOSED to be the exact same. That will be impossible because we are humans, so simply do the best you can. The easiest way to be aware of which side you naturally favor is to do a dry run on some throwaway wood first.
You CAN stop at 320, 400, or 600 grit. That's likely to be the highest grit you'll find at the local hardware store. An automotive store might have wet/dry paper as high as 1500 or 2000 grit. If you can't find any paper higher than 320, it's not a huge problem. Past that you're only polishing the wood.
That being said, I polish my fretboards up to 15,000 grit with Micromesh finishing pads from Stewart-Macdonald. This makes the fretboards mirror-reflective and super slick to play on.
Finishing the fretboard is never structurally necessary. The only reason to do it is to protect the lighter colored woods (maple) from getting nappy from your finger mung. If you do finish it, you only need to go to 220. You could probably get away with 150. More than 220 is a wasted effort because you cannot see or feel the difference through the finish.
It is debatable whether oiling a dark fretboard is beneficial or not. Some would argue that it could possibly effect the glue over time. I dispute this and oil mine. I just use boiled linseed oil. It doesn't offer an appreciable amount of protection for the wood, but it does bring out the color, which is all I'm looking for.
A note on inlays
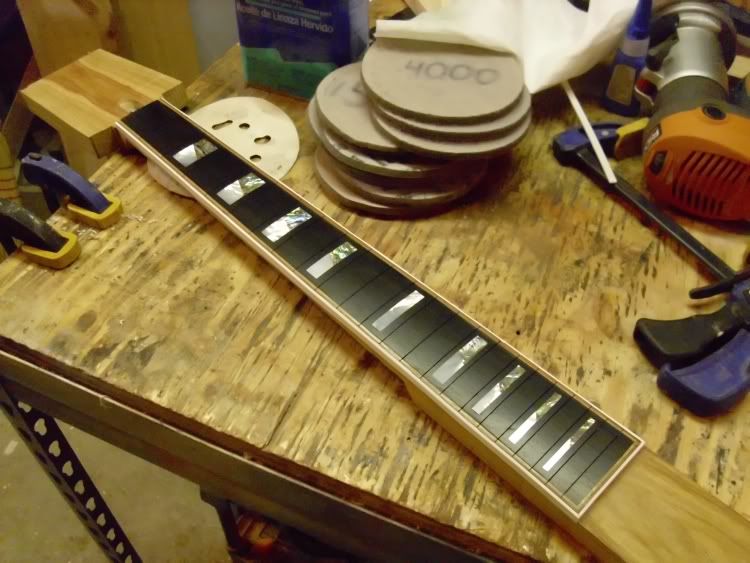
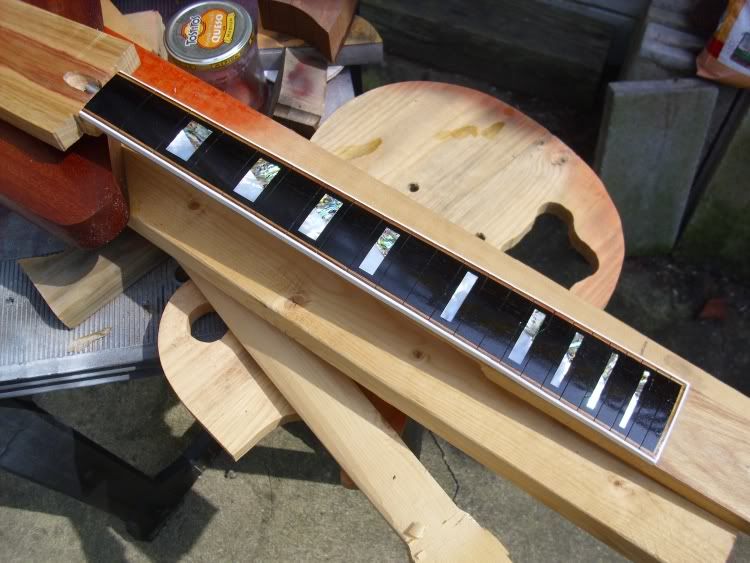
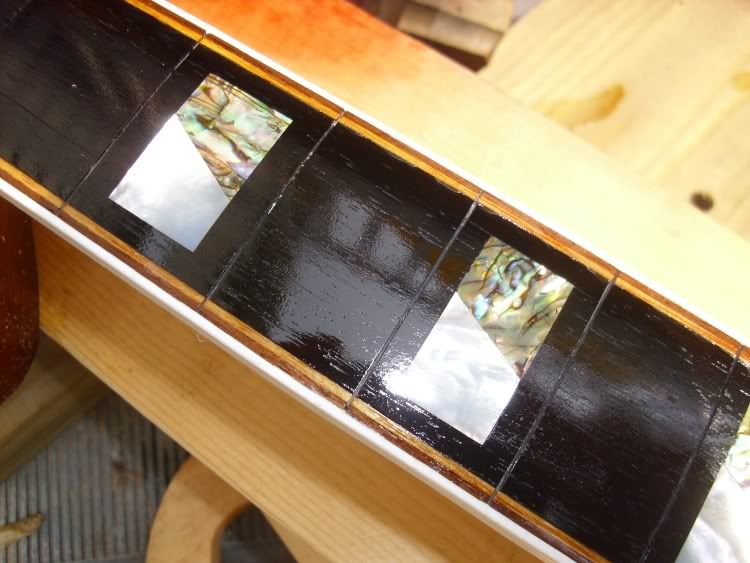
When you put in your inlays, be they dots, blocks, or something else, it's OK to let them sit a little proud of the fretboard. You want them as even as possible, but it's much better to leave them proud than a hair recessed. They get evened up in the radiusing process.
|
|
|
|
Post by avengers63 on Jun 7, 2010 14:44:52 GMT -6
|
|
|
|
Post by avengers63 on Jun 9, 2010 9:49:54 GMT -6
Let's de-mistify some things about fretting the neck, shall we? Fretting the neck is actually pretty easy. As long as you've taken the proper care in preparing the fretboard to receive the frets, half of the work is already done. The remainder is a continued, intentional effort to pay attention to the details. In retrospect, it's a LOT like gourmet cooking (which I have done). The actual cooking isn't any different than cooking anything else. If you've done all your prep work correctly, cooking it is a breeze. Then it's all in the presentation. So anyway, your fretboard HAS to be as dead-on level as humanly possible. If you bought a prepped fretboard from a reputable company, you shouldn't have to worry about it. That's shouldn't, not don't. Check to make sure it's level anyway. Any good long straight-edge will work. If you're doing it from scratch, you should have been checking it as you were doing the radius. If it isn't level, fix it now. You might also need to deepen the fret slots. Putting the radius into the board takes height off of the edges of the board, thus shallowing out the slots. If necessary, carefully deepen the slots by hand. You shouldn't need any kind of jig for this as the slots are already there. You just need to take your time and make sure the saw doesn't jump out of the slot and mar the face. TOOL LISTYou DO need some specific tools for this job. Some of them can be substituted for generic tools, come can't. FRET BENDER: You might be able to rig up something, or even do it by hand, but I really wouldn't recommend it. It's possible to find a pack of frets that have been pre-bent and cut into manageable lengths. These will cost more than bulk frets, but WILL save you a considerable amount of money. If you plan on making a lot of guitars, get a bender. FRET HAMMER / PRESS: You need something to get the frets into the slots. This means either a hammer or a press. Hammer: Any given small deadblow hammer will work. You want a brass head. I found mine for $9. It's the exact same thing that the luthier stores sell for $25+. Press: I've found that pressing the frets in gives me a MUCH better result than hammering. The price point for the fret presses left me hammering them in for a while. Then I gave something a shot, and it worked out beautifully. I bought the appropriate press insert, then cut a block of wood to both hold it and act as a hammering caul. 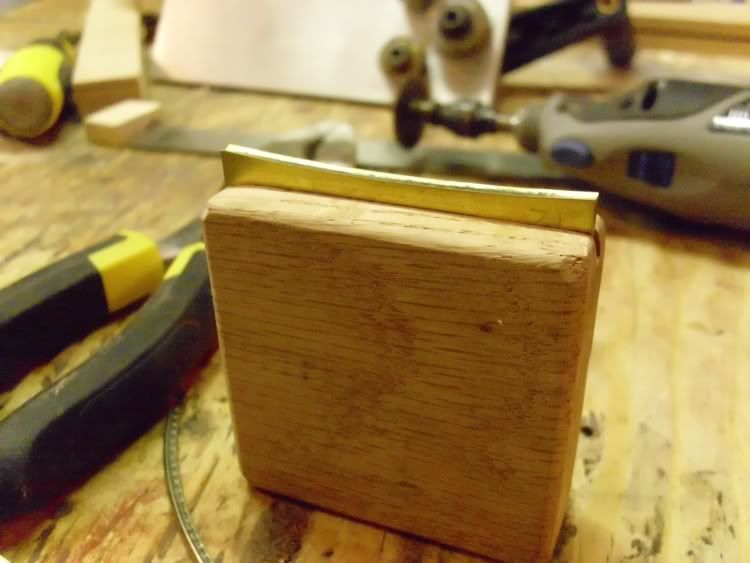 BANG! $5.00 and some scrap oak improved my fretting 100%. I'll line everything up and give it a couple of good whacks with a 22oz hammer and they're in flat, level, and perfect. I still keep the deadblow nearby for the occasional spot that just won't go in all the way. More on this later. CUTTERS: The frets are pretty sturdy stuff, so you need some heavy-duty wire cutters. I use my Dremel and a cutoff wheel. I highly recommend getting a Dremel as you can use it for other two other functions in this process alone. BEVELING FILE: You need something to bevel the edges of the frets. You could try to do it by hand, but it'll be pretty inconsistent. You can either buy one for $35+, or make one for the cost of the file and some scrap. If you don't have access to a table saw, just buy it. 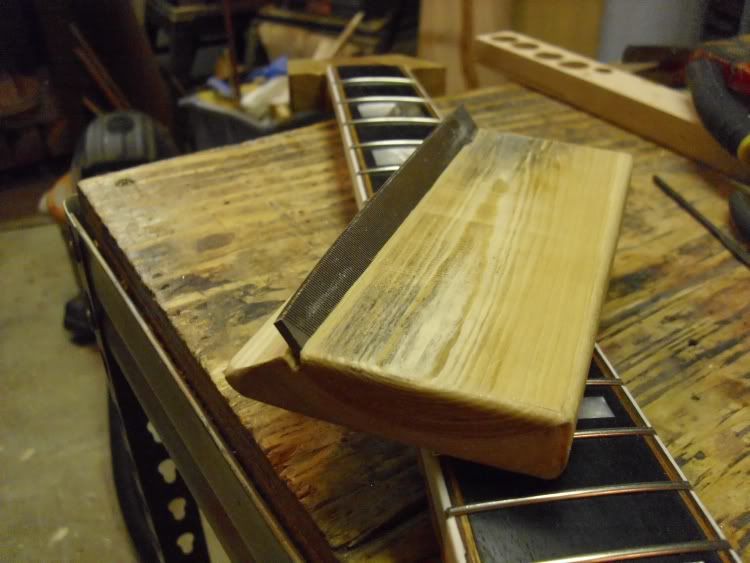 SMALL FILES: A couple of needle files are needed to dress the ends of the frets. $10 at the home center for a variety set. LEVELING BEAM: You can literally use a length of wood that's been planed level and some self-stick sandpaper. Or you can pay $50+ for a straight beam with a file on one edge. CROWNING FILE: Unfortunately, this can't really be substituted for anything else. And they're not cheap. And they have precisely ONE function. METAL POLISHING TOOLS: Dremel and painters tape. MISC: Other tools will be useful, but it's likely you already have them. Specifically, a pair of pliers, maybe some needle-nose, and flat-nose cutters to remove frets that might get damaged or just won't go in right. 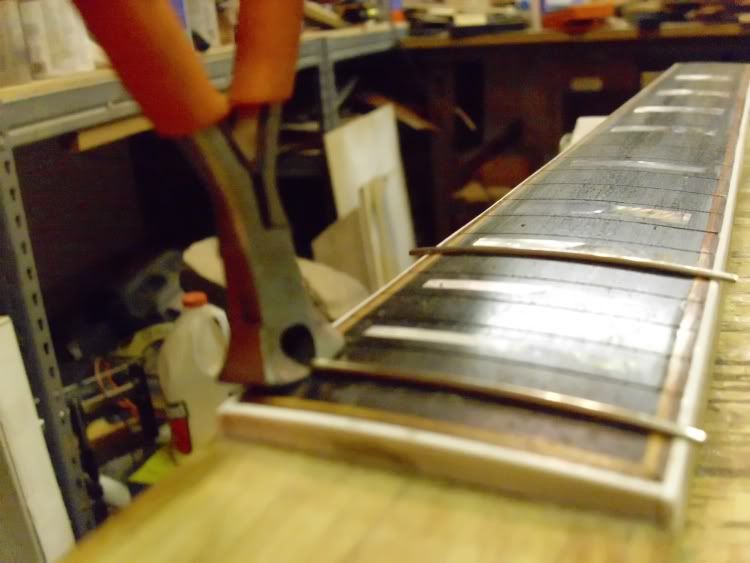 |
|
|
|
Post by avengers63 on Jun 11, 2010 16:22:29 GMT -6
OK, have you recovered from the sticker shock of what you just had to buy just to embed some bits of wire into some wood? Alright, let's get to it. First step is to bend the frets. The bending machine sold by the luthier shops are REALY easy to use and pretty self-explanatory. You want the frets to be bent to at LEAST the radius of the board. Bending them to a little tighter radius is fine, and is what I do. Bending them to a flatter radius will leave the fret trying to straighten out and trying to pull itself out of the slot. I'm sure the same argument could be made about bending them to a tighter radius, but I haven't had a problem with it yet. Some people will tell you to cut all the bits of wire at the same time. I cut them as I do the individual fret. Neither will be wrong. I feel like I can conserve fretwire this way. Maybe it's all in my head, but there's no harm in it, so I'll go ahead and be loopy about it. ;D This fretboard is bound. This means we'll need to trim the tang on the ends of the frets before installation. If your fretboard isn't bound, ignore everything revolving around this. Yes, it's a LOT easier to do a neck that isn't bound. A bound neck is more decorative and can be a LOT more fancy. It's all something to consider in your design stage. To trim the end of the tang, you can either buy an expensive one-trick-pony tool from a luthier shop, or you can get out your Dremel with a heavy-duty cutoff wheel. The Dremel is looking like a pretty good buy, isn't is.  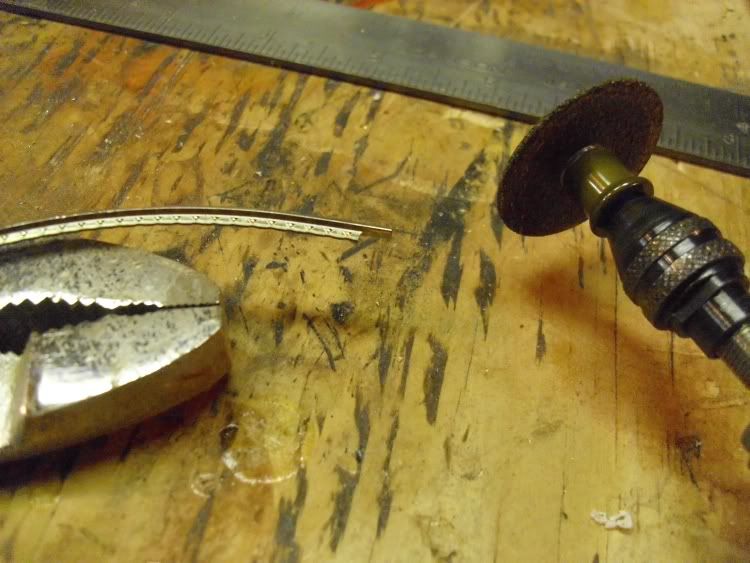 The tang needs to be ground/cut flush with the fret. Take care not to grind into the fret itself. It's a tricky balancing act when you take the tang from the other end of the fret. You need to leave just enough tang to span the width of the slot between the bindings. If you leave too much, the tang will press against the binding and could pop it right off. Cutting it too short night allow the fret end to not sit flat against the board because there's not enough holding it in. You could also be looking at the fret curved bore than the board itself and will have to compensate for it flattening out as it goes into the slot. So have I convinced you yet that your first neck should NOT be bound? Good. 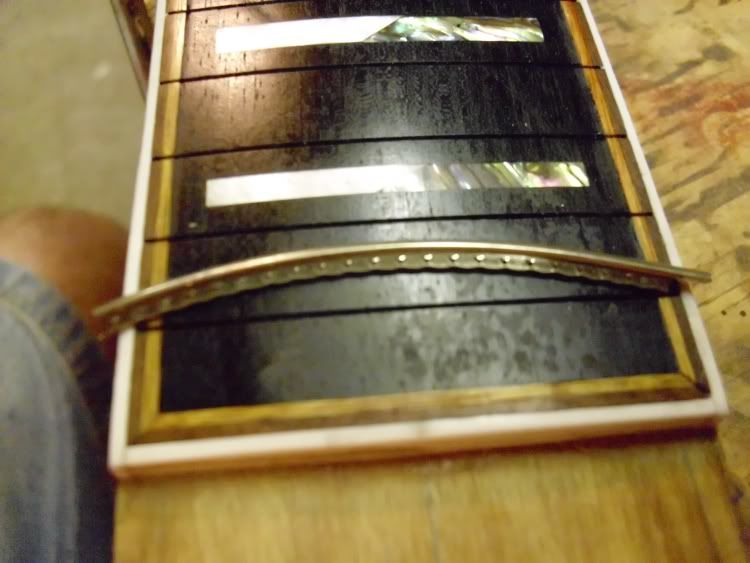 The other end isn't cut yet in this picture. I suggest working from the higher frets and going up the neck. The board is wider as you go further down the neck. If you cut one too short, you can immediately use it on the fret slot it fits better into, thus not wasting the wire. When you have the tang cut the way you want it, take the deadblow hammer and LIGHTLY tap the ends of the fret into the slot. All you want to do is secure the ends. 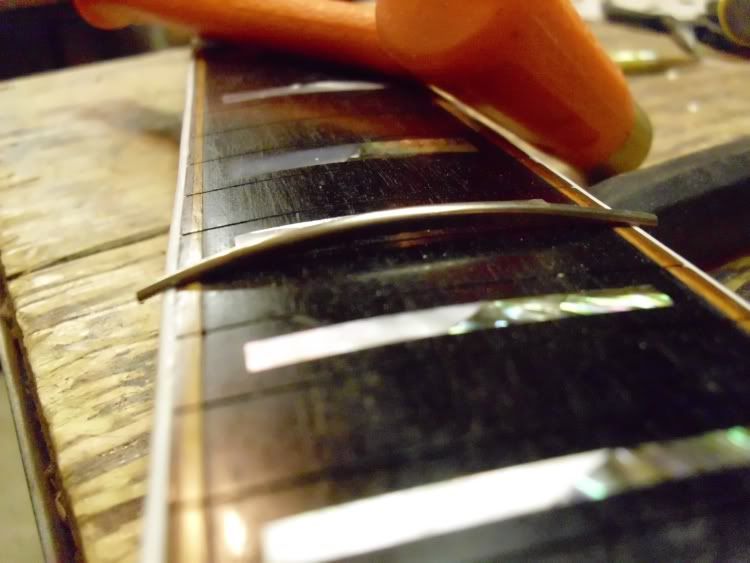 Now, remember THIS doomeflager? There's a groove in the radiused side for the fret. Place it on top of the fret, holding the block by it's sides, then give the block a couple of good whacks with a regular hammer. This is what you should be left with: 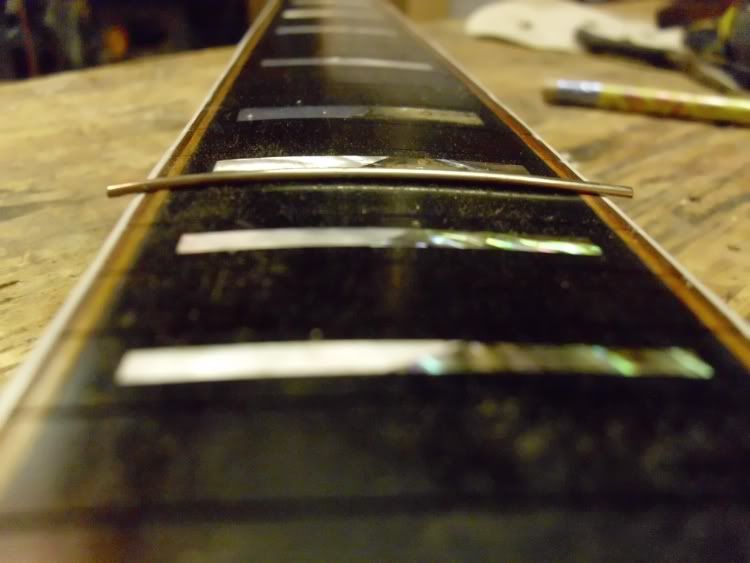 The ricochet MIGHT cause the hammering block & insert to jump off of the fret. Take your time delivering the blows. If it jumped off, you'll make a line in the fretboard with the brass insert that you'll never get out. If the fretboard is finished, you'll crack the finish right off. Yes, I know both of these from experience. It's also possible that there was a slight low spot in the fretboard you missed, or that the process simply didn't get the fret all the way in there. That IS the case with the picture above. Take your deadblow hammer and LIGHTLY tap the fret into the slot. If you nail it a couple of times, you'll flatten it out and make the leveling a real chore. 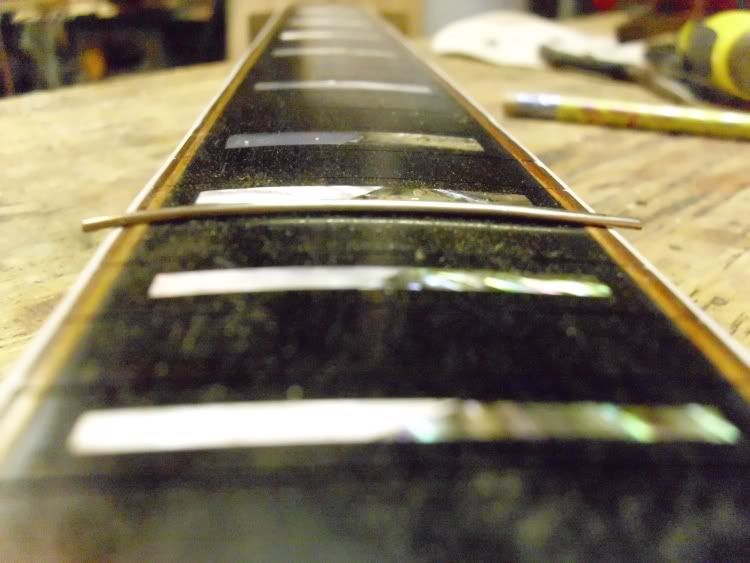 From there, you simply take the process right up the neck until they're all in. Like I said, doing a plain fretboard is a LOT easier. I'll tap the wire into place, cut off the rest of the coil of wire, then tap the next fret into place, etc. etc. etc. until the wire has been used up. Then I'll hammer them all into place. The whole thing takes probably 3-5 minutes. A bound board is probably 1-2 minutes per fret. If you have the funds to invest, I highly suggest sacrificing some wire in a board you would ALSO sacrifice. Do your first fret job in this so you can get the feel of it and make your initial mistakes there. It's basically money down the tubes, but you'll be gaining an education and experience from it, so it wouldn't be COMPLETELY wasted. Actually, I'd suggest making the entire guitar (except for the truss rod) from some cheaper wood you can afford to take the financial loss on. Construction pine or poplar would make excellent learning woods. |
|


 This will need to be cleaned up later. I extended the line to the end of the body and made for dang sure NOT to rout into that area.